| Enermax Maxflow CS-718B ATX Case - Page 3 of 5 |
First Impressions (Interior, continued):
Next thing you are likely to notice is the PCI expansion card locking system. These types of tool-less systems are becoming much more common. This is the third case I have used that had a similar system and without a doubt the Enermax system is the best I have seen. The clips, like everything else in the case, are well made and sturdy. All you do is depress the latch and swing it out of the way, insert your AGP/PCI card and then snap the latch back in place. It locks shut with an audible click letting you know it is latched. The system holds the cards very securely, unlike some other similar systems I have seen.
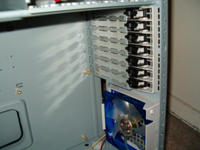
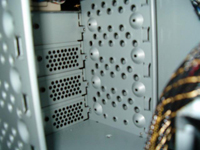
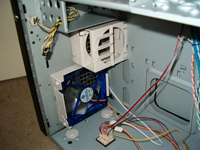
Another thing you should notice in the above picture is the hole cut in the mother board tray under where the CPU will be resting. This is to help vent heat from the CPU out from under the mother board. As you can see I outlined the placement of the vent hole in the side panel with a sharpie. I did this before mounting the mother board, thinking ahead and once again thinking of future modifications I may want to make to the case. It looks like a great spot of a small 60 mm fan to exhaust unwanted heat from the CPU and Enermax as done half the work for us but putting the hole in the mother board tray. We will find out if we need that extra cooling once we get a system installed into the case.
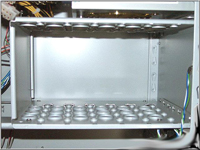
Moving our way upward the next thing we see is the hard drive cage, which sits right above the mother board and under the power supply at the back of the case. The hard drive cage holds up to six 3.5 hard drives. The drives mount using a tool-less drive rail system. The rails simply snap to the drive and then slide into the bay and lock into place. The drives mount standing on their side with the power and data connections to the back of case rather than showing toward you as you install them.
Last but not least we come to the power supply. The CS-718B comes with Enermax model #EG465P-VE Whisper II 460 watt power supply. The Whisper II series has been around for a while now and has a solid reputation. This model has an updated mother board connector to accommodate newer BX mother boards. If you are using an ATX mother board the extra 4 pin portion of the new connector can be slid back out of the rails on the main portion of the power connector leaving you with a standard ATX style connector.
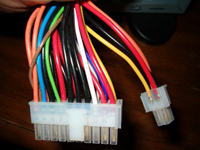
The motherboard lead is wrapped nicely the full length however the 12volt molex leads only have the wrapping about 4 out of the body of the power supply. Other power leads include the following.
Seven 4pin 12 volt Molex connectors
Two 4 pin floppy connectors
Two SATA power connectors
12 volt power and auxiliary connectors
Six pin PCI-E video card connector
Fan RPM monitor lead
As you can see, this power supply is already set to handle future upgrades such as PCI-E graphics cards and BX mother boards. Then throw in the fan speed controller on the back of the power supply which controls both power supply fans and has an automatic over ride. If you set the fan speed too low and the power supply gets to hot it will over ride your setting and speed up the fans. All of this makes for a very nice power supply that should meet the demand of just about any system you want to put into the CS-718B.
The last two things to talk about are the 5.25 drive bays of which there are four. They use the same drive rail system as described with the 3.5 bays. The EMI shields for the 5.25 bays do have threaded screw holes to remount them like mentioned before but do not come with screws holding them in place and need to be twisted out of the case. The mesh drive covers on the front door are held in with two screws and will require a screw driver to remove them. Finally we have an 80mm fan cage that sites right above the front intake fan and wind tunnel. A standard 80x25mm case fan slides into it and snaps into place.
Alright, that covers the inside of this bad boy! Now lets move on and install a system and see just how well this all works.
Please read on to the next page for more... Next
Page 1 | Page 2 | Page 3 | Page 4 | Page 5 | Home | Forum | Review Index
|
|
|
|


