Included Accessories (continued):
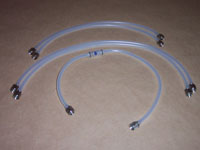
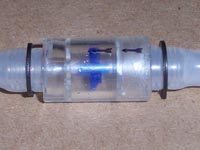
To transfer the water coolant through the various pumps to cooling blocks, you have to use tubes. Evercool has included several silicone tubes to do this. There are two short (40cm/15.75 Inches), and three long (55cm/21.65 Inches). One of the long tubes includes a flow monitor that spins when water is flowing through it. This is a nice feature as it gives you a quick way to visually verify water if flowing. On the flow monitor, there are arrows that point in the direction that the water should flow. I marked these in black so you could see them; otherwise they are the color as the monitor.
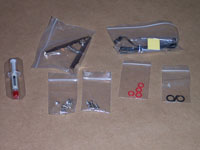
Finally, you have all the extra accessories. If the tubes are too long, you can cut them down with an included cutter. You must apply thermal paste to your CPU and VGA chips prior to installing the cooling blocks, so Evercool has included a little tube of thermal paste. Since there is a thermal connection on the main unit, and you should monitor the temperature of your CPU, they have included a thermal probe, and a piece of thermal tape. Other accessories include eight (8) screws to mount the main unit, four (4) screws to mount the radiator, four (4) replacement red washers, and two (2) clips to be used if you shorten the water tubes. Everything you need is included!
Initial Configuration:
Configuring the unit is not difficult, but does take a little bit of time. You will need to remove your current heat sinks prior to completing the installation of it.
You will want to be sure there are no leaks in the unit prior to installation, so it is best to assemble the kit outside the case. The first thing you will want to do is to make sure the tubes are of proper length, as you do not want to have to cut them after you've already put the system together. I did this after I performed testing, and found it to be very easy to do since Evercool has included a cutter and the clips.
After the tubes are the proper length, connect them to the main unit and the other components. On each of the components, there is no official intake or outtake. This is only a concern when connecting the tubes to the main pump assembly. If you use the water flow indicator tube, make sure the water is going the proper direction. There is a little arrow on it to show the direction the water should flow through it.
After everything is connected, you need to fill up the unit with antifreeze and distilled water. I used the included bottle to perform the fill by putting the antifreeze in first, then 3 bottles of distilled water. This was a time consuming process, as the nozzle on the bottle is small and if I went too fast it would back up and overflow. Several people advised me to use a small turkey baster to do the filling. While this might work on the larger and more professional units, I will try filling it with a turkey baster after I'm done with testing. After bleeding the lines and removing air bubbles from the lines, the entire process probably took 20 - 30 minutes.
Something else I decided to try after I removed the system was to remove a piece of the set-up, to see if there was much leaking. I pinched the tube a little away from the connectors, and raised it above the main assembly. I removed the component I didn't want and reconnected the tubes. There was a little leaking, but not much. Granted you will not want to do this while it's in your system, but I was happy to see that I didn't lose much of the fluid changing components.
After I removed it from my system and drained it, I decided to try filling it with a turkey baster. I can see why you might want to do this, but for this unit, it was not helpful. It overflows very easily when you push that much water into the system at one time. This will cause what will appear to be a leak, but it's not, just overflow that will drop down the fill port, into the unit, and out through any opening on the bottom.
Please read on to the next page for more... Next
Page 1 | Page 2 | Page 3 | Page 4 | Page 5 | Page 6 | Page 7 | Home | Forum | Review Index
|
|


