External Examination (continued):
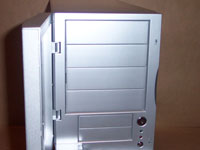
Behind the door, you can see the usual four (4) 5.25 drive bays, two (2) 3.5 drive bays, and the usual power button and reset switch. I did notice that the door has a magnetic latch. It's not very powerful, but was strong enough to keep the door shut if you tipped the case while moving it.
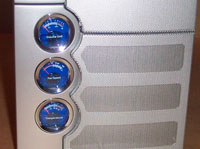
Here is a closer look at the analog meters. At the top is the sound (volume) meter, next is the fan speed, and the temperature meter is at the bottom.
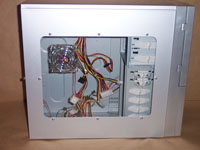
Turning the case to the side, I can see the side window panel. Bright silver rivets attach the window. You will also find a 80mm fan, which I found out is a very bright blue LED crystal fan. The fan I received in my case was faulty. Once it was powered up you could hear the fan blades hitting another piece, which caused a loud noise. One thing I usually find with side window panels is that they either show off too much of the internal case, or not enough. This is strictly a personal preference. The window here shows off too much (personal preference), I would have preferred the window stop just before the drive bays, so you wouldn't see all the tool-less drive bays. Again, this is a personal preference, and will not take away from a final rating.
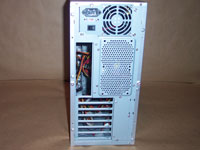
On the back of the case you find the usual culprits. PCI bay slots, motherboard port, power supply, and two (2) 80mm exhaust fan vents. When examining the inside of the case, I found out that the exhaust fan vents are designed for either two (2) 80mm fans, or one (1) 120mm fan. This is nice, as you can decide which you would rather have. Sunbeamtech has installed a 120mm fan for you, but the option is there to use 80mm fans if you desire. The exhaust vents are cut into the case, which helps with airflow, but also restricts it some. It would have been better if the vents were totally cut out, and in place was a grill cover. This would be difficult to do though since the case allows both 80mm and 120mm fans.
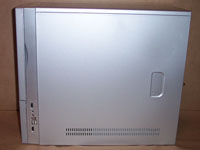
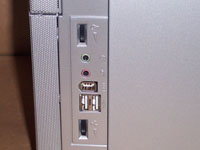
Turning the case to the final side, there is not much to notice. This side panel is solid, with a few vents at the bottom. At the front of the panel though, are some USB, Fire wire, fan speed, headphone/microphone jack, and volume controls. This is a nice placement, of the controls, much better than at the bottom like so many cases. The one issue I have with this placement though is that it means you have to keep access to the right side of your case, which in some locations could be inconvenient. For my desk it's a great placement, as this case will reside to my left. Id much rather have these connectors on either the front bezel (but not on the very bottom), or at the top front section. Again, it's a personal preference.
Please read on to the next page for more... Next
Page 1 | Page 2 | Page 3 | Page 4 | Page 5 | Page 6 | Home | Forum | Review Index
|
|


