| RaidMax X1 ATX Gaming Case - Page 3 of 6 |
Internal Examination:
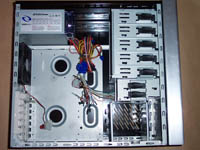
Removing the side panel, I can get a full view of the internal layout of the case. The tool-less drive bay mounts are nicely placed and mounted to the drive bays. These mounts are located on both sides of the case, so to put them on the other side you will have to remove the other side panel. You'll notice your hard drives do not mount in the same direction as your 5.25 bays. Mounting your hard drives in this direction will allow you to save valuable case space, while still allowing a fan to blow over your drives to keep them cool. Here you can also see the exhaust vents on the back panel. Raidmax has included a plain power supply with the X1, I will speak more about the power supply later. As with many of the newer cases, all corners were either filed down or rolled so you won't cut yourself while installing your components.
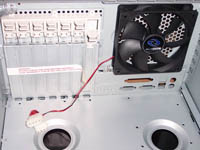
Everything is standard on the back of the case. You can see the expansion slot tool-less brackets. This design has changed a little from the last time I saw this on the Sunbeam Trio. I had no issues with a full height video card with these brackets. The factory expansion slot covers are still installed here to help avoid any damage during shipping. Be careful removing these, as I found them to be a little more difficult to remove than other cases. Raidmax has included a single 120mm exhaust fan. This will provide optimum airflow but keep the noise level to a respectable level.
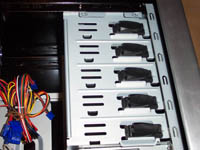
The implementation of the tool-less PCI slots is a little different than on past cases. There are individual switches for each bay. There are little metal plugs that go into the hole that is usually reserved for the screw. This helps to secure the drives in place. I did not have any issues mounting any device with these. Once the device was flush with the front of the case, it was as simple as pushing these in and sliding the locking mechanism into place. These are located on both sides of the bay, so you will need to move the back panel in order to get to those.
 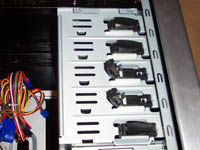
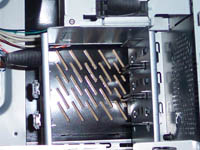
As for the hard drive bays, you can see them up close here. There are plastic anti-vibration supports, and the same tool-less brackets as the above bays. These proved a little more difficult to get put into place. The drives slide in snugly, and since there is no "flush" point, you have to locate the hole to put in the tool-less bracket. It only took about 5 seconds longer to put into place than the 5.25 bays. As you can see there is room for three (3) standard hard drives.
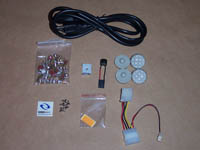
Raidmax has included a few accessories with the case. They have included four case feet, a small speaker, a single PCI slot cover, mix bag of screws/supports/paper washers, the infamous (but necessary) power cable, Raidmax sticker, Molex power cable (with splitter for 3 pin fan), and an unknown bracket (perhaps used to implement a lock). I was a little disappointed that they did not include any expansion slot covers, I have many of them from my past cases, but not everybody will have extras, nor will they fill all slots with cards.
Please read on to the next page for more... Next
Page 1 | Page 2 | Page 3 | Page 4 | Page 5 | Page 6 | Home | Forum | Content Index
|
|
|
|


