Installation (continued):
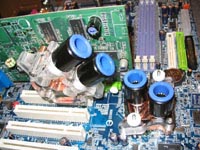
With the video card in place, I noticed something else that concerned me just a little. As you can see in the image below, the angle of the GPU blocks connections will send the tubing straight into the path of what will be the chipset cooler's tubing. The generally accepted flow path takes the tubing from the CPU block, the Y combines the two lines into one, then into the GPU block, and then into the chipset block. I don't think I will be able to loop the tubes into a radius tight enough to make this connection, and will be running an alternate configuration...
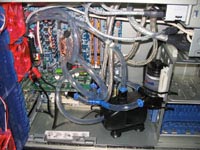
The images below show the final plumbing of the WaterChill... It looks extremely busy, and by the time everything was installed, the case proved to be much smaller than I had anticipated. It took hours of serious contemplation to get everything installed as shown (n my mind the best possible), as I mulled over every and any possibility to get this to work... it was tough!
Following the tubing in the below left image, we have the following path: 1. reservoir, 2. pump, 3. radiator, 4. CPU, 5. GPU and chipset in parallel, 6. Y connector leading back to the reservoir. Not the recommended installation, but it fit, with some work. Note that the pump is not sitting on the bracket mentioned earlier in the review... That wasn't possible either. I didn't have clearance under the video card, and the orientation of the inlet and outlet made the plumbing difficult.
 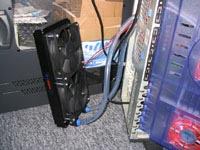
Not mentioned yet, is the placement of the radiator... It wound up outside the case, standing on the floor. Eventually I intended to fabricate brackets to hold it off the back of the case, and will continue to run the tubes and fan power leads out through the back of the case. The WaterChill Control Unit is mounted between a case exhaust fan and the PS2 mouse/keyboard ports on the ATX backplate... It proved to be a fairly convenient location to tie in all the necessary lines, without making an unsightly mess of wires.
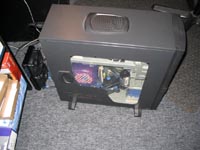
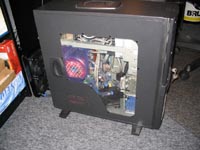
The two images show the case all closed up and ready to roll. Well, roll might not be the best word, as it isn't particularly mobile with the radiator just dangling out the back, but one thing is for sure... The thermal performance should improve with the radiator out in free air!
Overall, the installation proved to be a bit time consuming, and did require some modifications. Anyone considering a water cooling kit should be aware that these things are not "one size fits all" and some ingenuity is going to be necessary. The size of the radiator is one such issue... I knew it was large and would be difficult to locate before starting the review, but it is just a matter of being creative. On the other side of the coin, the issue with the GPU and chipset blocks needing to be trimmed strikes me as an issue to be addressed at the design stage.
An absolutely critical feature of installing any water cooling kit is to perform a leak test... Did you notice I haven't mentioned one yet? In general I plumb everything up before putting it in the case, and let it run for 24-48 hours to make sure there are zero leaks. Due to the complexity of the installation, and the fact that it was internal and external to the case, I didn't want to have to install it more than once. With all of the water cooling components in their final positions, I filled the system, and proceeded to leak test it in the case. I wouldn't recommend this to any one else, but with only power going to the water pump, I let it run in place for 24 hours and was very pleased to see no leaks! Very pleased!
Testing:
Testing will be focused on two things... noise and temperature.
The noise level was a minimal improvement in this situation. The stock CPU cooler was not particularly noisy, and the GPU was cooled passively. So, I swapped one 70mm fan for a large water pump and two 120mm fans. Luckily the fans are truly very quiet, as the only new sound I can distinguish is the hum of the pump, which is a bit quieter than the CPU fan was. OK, the noise level didn't wow me, it really wasn't bad to begin with... But, the thermal performance wasn't all that great with the stock coolers, so I am hoping for something impressive there!
The thermal testing involved two stages:
1. Comparing the stock coolers to the Asetek WaterChill components at idle and load conditions while at the default speeds.
2. Comparing the WaterChill components at idle and load conditions while at default speeds to idle and load conditions while overclocked.
As I mentioned, the stock cooling, especially on the GPU, wasn't all that great, so I didn't even want to try overclocking without something with a little more cooling performance.
The following information provides the baseline for all testing:
All temperatures were monitored using three external, digital thermal probes.
Thermal probes were affixed to the base of the coolers, as close to the respective chips as possible.
Ambient conditions were maintained between 19.5 and 21 degrees Celsius during all stages of testing.
Idle conditions were established by not running any applications for a period of one hour (minimum) and recording the stabilized temperatures.
Load conditions on the CPU and chipset were established by running the SiSoft Sandra 2004 Burn-In Wizard (CPU tests only) for a period of 30 minutes (minimum) and recording the maximum temperature.
Load conditions on the GPU were obtained by running 3DMark2003 repeatedly for a period of 30 minutes (minimum) and recording the maximum temperature.
Please read on to the next page for more... Next
Page 1 | Page 2 | Page 3 | Page 4 | Page 5 | Page 6
Home | Forum | Review Index
|
|


