Installation:
The Asetek Waterchill Power Kit will be installed, and subsequently tested, in a system with the following key specifications:
AMD Athlon 64 3200+ Clawhammer processor
Gigabyte GA-K8NS Pro nForce3 250 motherboard
128MB Sapphire Radeon 9600 video card
Ultra Products Xconnect 500W power supply
Windows XP Professional SP2
Enermax CS-10182-BA server tower chassis
The system features some decent components that could benefit from improved cooling, and I know I would appreciate a reduction in the noise level. The Enermax case is a big box, and I am hopeful that the installation will go smoothly and result in improved thermal performance, reduced noise, and hopefully a stylish look visible through the cases clear side panel...
The first step was to remove the motherboard from the case, as the CPU and chipset water blocks are mounted by bolting them through the board. The two images below show the stock configuration, with the processor already in place. The Gigabyte board features a minimal heatsink fan on the chipset, and although not shown, the stock cooler on the CPU was the retail AMD unit with a copper base, thin aluminum fins, and a thin 70mm fan.
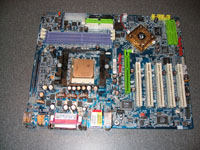 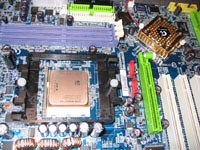
The black retention frame around the CPU needed to be removed, which simply involved releasing the two white pins holding it on either side of the CPU. The top of the frame comes off, as does a black plastic sheet found on the back of the board.
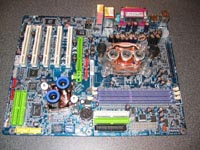
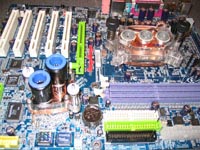
I won't walk through every step of the installation of each component, but the included manuals provide more than adequate detail to make sure the right hardware is used for an easy installation. The images below provide a look at the board with the two water blocks securely affixed to it. As shown in the images, each block is held on by two bolts, which use springs to provide appropriate pressure when the thumbscrews are tightened all the way down.
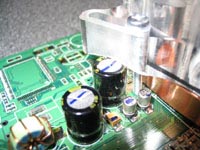
My first issue with the installation was encountered while trying to mount the chipset water block. A capacitor found close to the northbridge interfered with the mounting tab on the water block's cap. My solution was to us a Dremel to remove just enough material from the base of this area of the cap, as pictured below.
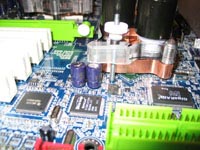
This modification will in no way jeopardize the seal, or the strength of the device, so it was just a matter of making some head room. But, it does have me questioning the necessity of the thickness of this particular area of the cap. Surely other might have this type of clearance problem, and making the mounting tabs thinner and further from the board may be a good idea. Other manufacturers use a metal plate at the top of the water block for mounting tabs, and I see the benefit of that design now.
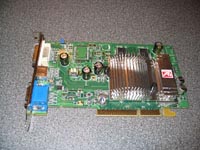
Next up, the video card needs to be switched over from its passive aluminum cooler to the WaterChill water block. As might guess by the appearance of this card, it wasn't really set up for overclocking, and I am hoping the cooling boost provided by water cooling will remedy that. The GPU block mounts very much like the chipset cooler, and uses through bolts with thumbscrews to hold it in place. The stock cooler blocked a few of the memory chips from accepting ramsinks, and although the orientation of the connections may create a bit of interference with taller devices, I am more confident that I can now cool the memory as well.
 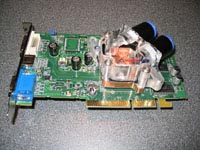
Just as with the chipset cooler, I ran into an interference issue with a capacitor on the video card. This time a little more Dremel work was required, but in a matter of minutes I had just enough clearance to bolt everything together securely, as shown in the image below...
After having to modify two of the water blocks with a Dremel I am convinced the design of the water block caps should be reconsidered. Not a major problem, but one that could be easily be remedied in the design stage, instead of on the purchaser's workbench!
Please read on to the next page for more... Next
Page 1 | Page 2 | Page 3 | Page 4 | Page 5 | Page 6
Home | Forum | Review Index
|
|


