| Sunbeam Tech Samurai ATX Case - Page 2 of 3 |
Closer Look (continued):
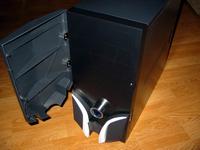
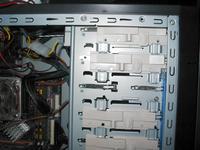
The Sunbeam Tech Samurai has 5 external 5 ¼ bays, 1 external 3 ½ bay and 4 internal 3 ½ bays. That is a lot of drive bays for a mid tower ATX case, plenty of room for multiple optical drives, fan controllers, lighting controllers, and of course hard drives. Most cases that use drive bay doors suffer a major draw back; nothing can protrude past the front panel and still allow the door to close. The Sunbeam Tech Samurai does not have this issue. Because of the unique mask style of the door, there is plenty of room behind for even the largest fan controllers.
Assembly:
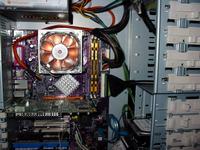
The following components were used in building this system:
ECS 848P-A Motherboard
Intel 2.4 Gig Processor
Thermaltake Pipe101 cooler
1 gig of Ultra PC3200 ram
Radeon All in Wonder
DVD Rom
1 WD Raptor HDD
2 80 gig WD SE HDDs on a Promise ATA RAID card (RAID 1)
Thermaltake 480 Watt PSU
After clearing out the accessories I began building a system around the Sunbeam Tech Samurai case. I found right off the bat that the 4 screw holes for the power supply were not quite lined up right and had to do a little forcing to get all four started. After the PSU was installed, I fixed up the motherboard to get it ready to install. You will have to remove the fan holder from the back of the case to get access to some areas of the motherboard. The standoffs tightened down without fear of stripping. Needing to install the back plane panel that came with the motherboard, I wiggled and twisted the punched out back plane and with excessive force and a pair of wire cutters finally had it out. On other cases I have dealt with, this task was much easier. The motherboard lined up very nice with all the connectors pressed tightly against the back plane. This is important when trying to line up PCI cards and AGP video cards. After the processor, heat sink, and ram were installed, it was time to add some drives and just a couple of cards.
Installing optical drives was extremely simple except for one small thing; the front cover of the case must be removed to slide the optical drives into place. The front cover is removed rather easily by pulling gently on the bottom until it pops off. Once the drives are lined up flush with the front, the drive holder gets slid into position and the lock slides down to keep everything tight. Hard drives are installed in much the same way, but they are installed from the rear. Once the holder is slid into position and the lock engaged everything is very secure.
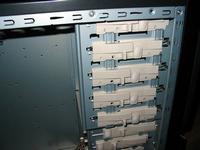 
I did run into one issue with the tooless design. Any device that needs to be installed into a 5 ¼ bay that isnt built like an optical drive will be more difficult to secure. Fan controllers or other devices that have wings for securing dont work very well with the slide locking mechanism. I removed one of the plastic slides and luckily found standard screw holes beneath. The slides come off and on fairly easily by backing them up enough to line up slots, and then swing the top out. The opposite side of the bay also has screw holes for conventional mounting.
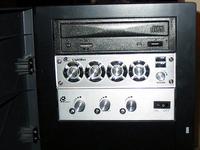
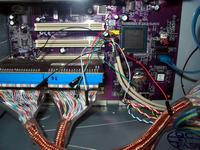
The case has connectors for the hard drive LED, power switch, reset switch, small speaker, and a shielded bundle for the two USB connectors. The shielding allows the connectors to run in USB 2.0 mode if connected to USB 2.0 headers. The giant blue power switch dome is powered off a 4-pin Molex connector. The USB wires have both a single 5-pin connector and piggybacked off of that are separate single wire connectors in case your motherboard header does not fit the standard USB layout. This seems like a good idea initially, however as seen in the pictures below, the singles turn into a rats nest if not used. Even though single connectors are a pain to get plugged in correctly, at least you dont have this kind of mess showing through your case window.
Please read on to the next page for more... Next
Page 1 | Page 2 | Page 3 | Home | Forum | Review Index
|
|
|
|


