The Basics (continued):
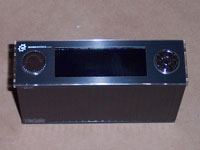
Removing the Sunbeamtech Chromatic Windmill from the box you can see the front of the device. The unit I received is black (also available in silver), and the front bezel is protected with a clear plastic plate. The front of the unit includes a +/- dial on the left, a large LCD screen in the middle, and a group of buttons on the right. These buttons allow you to select the functions you would like. The buttons allow you to choose between C and F, Fan, Button Lock, and finally Settings.
 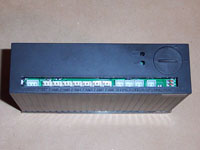
On the back of the Chromatic Windmill you will find all the connectors neatly lined up, and well labeled. There is no guessing which connector goes where, which is very helpful since there are many different connectors. You will also find a place to install a back-up battery. If the power is ever lost to the unit you won't lose your settings. This is a great feature, as I have always hated moving components around and losing the values that I had programmed in! Finally, there are two little holes, one marked Reset, and another C/F. The Reset allows you to reset the unit to factory settings. I didn't do anything with the C/F since it's located on the front of the unit. I found it somewhat odd to have two locations to select the values of the thermal readings (in degrees C or F).
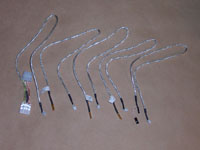
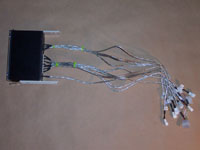
With so many connectors on the back, there are many included cables. First I will look at the power connector, thermal sensors, and HD activity sensor (below left image). The power connector is a standard 4-pin molex plug, and includes a pass-through connection. I noticed the wires for the pass-through were fairly lightweight, I would caution putting anything that pulls a heavy load on the pass-through. The part that connects to the main assembly looks like a standard 4-pin mini power plug, nothing special. Next there are the three thermal sensors. Since thermal sensors are fragile, each sensor has a thick rubber tube placed over it to keep it protected! Finally you have the HD activity sensor, this was impressive, and something I wish more peripherals would do. It is a pass-through HD activity sensor, so instead of having the HD activity on either the front of the case or the Chromatic Windmill, you can have it in both locations! Every cable is nicely wrapped and labeled which is helpful since there are so many cables.
 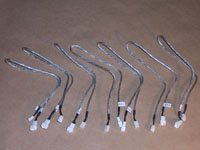
Finally, there are the fan power connectors (above right image). Nothing too fancy here, they are the normal 3-pin fan plug, so if your fans have 4-pin power connections you'll have to get an adaptor on your own. Once again, all the fan power connectors are nicely wrapped and labeled.
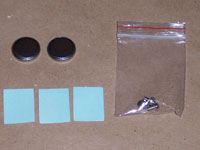
The final accessories included are two button batteries (used by the main assembly to keep power settings in the event of a power loss), three pieces of thermal tape, and four little screws so you can mount the main assembly.
Installation:
To make the installation as easy as possible, I would recommend two things. First, install all the cables before installing the device. On other fan controllers, I always had an issue with unplugging the cables by accident. The slightest tug and they would be unplugged. Sunbeamtech has taken this into consideration, and made each plug so it snaps into place. They are still easily removed, but take a little more force than a light tug. The second thing I did was to use a cable tie to tidy the cables up close to the unit. There are so many of them, I felt it would be helpful to have them all connected for a short distance from the main assembly. You definitely don't want to go too far down the line with the ties, but one or two ties is helpful to keep them tidy. It's much easier to manage a couple bundles of cables, than 10 individual cables.
Once all the cables were installed, completing the installation was a breeze. Simply slide the completed unit into an available 5.25" drive bay and complete the cable connections. Make sure you use the right thermal sensors when applying them, which is easy to do as every cable is well labeled. Also, be careful when handling the sensors as they can be ruined very easily. After everything is plugged in and turned on you get the fun of changing the settings to your personal preference. Whether you use the included screws or drive rails from a tool-less case, the Chromatic Windmill fits well.
Configuration:
There are several things you need to set on the Chromatic Windmill, along with your personal preference settings. You will obviously need to set the date and time, which is as simple as pressing and holding the "Set" button for 5 seconds. After 5 seconds, the options to adjust begins to flash, and you can adjust each value. Press "Set" again to move to the next option, and so on. Setting the Fan speeds is just as simple, except you press and hold the "Fan" button.
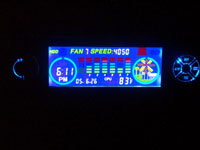
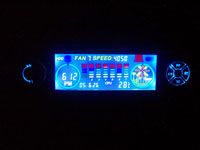
The big LCD screen gives you a lot of information at a quick glance. At the very top of the LCD, you have a row of information, HDD shows that your hard drive is connected, and then there is a little icon next to it that flashes when there's activity. Next you get the numeric value of each of your fans. These values auto-advance, so you can either sit there and look at them or press the Fan button to advance. Next to the fan speeds, is a red Overheat Alarm indicator. Finally you have a key lock icon that indicates whether your option buttons are locked.
The larger portion of the LCD gives you the most important bit of information. There is a big area for the time in a 12-hr clock; no 24-hr clock option was available. To the bottom right of the clock is the date, done in a European format, of YY.MM.DD (2005, June 26). In the middle off the LCD you have a graphic representation of all seven (7) fans done by a bar graph. At the very lowest speed, it is green, in the middle speed range you get blue, and at the highest speed you get red. This is a nice way to quickly see how your fans are performing. Below the graphs is the temperature indicator, which auto-advances as well. The three sensors are labeled as CPU, HD, and System, and you can adjust whether you want it in degrees C or F by simply pressing the C/F button.
Finally, you can see that a blue light that matches the blue shade on the LCD lights up both the +/- dial and the buttons.
Please read on to the next page for more... Next
Page 1 | Page 2 | Page 3 | Home | Forum | Review Index
|
|


