Vantec 3.5" NexStar 2 USB2.0 External Enclosure (NST-355U2):
Physical Features (continued):
The images below provide the first looks at the actual enclosure, in the two orientations that it can be used in. Where the Ultra Products enclosure was really only intended to be used vertically, the Vantec NexStar 2 can be installed horizontally or vertically.
 
The styling of the enclosure is pretty slick! It features two white plastic plates for the large surfaces, and grey slotted plastic sides. The whole thing is held together by four grey plastic clips that double as feet, thanks to rubber inserts found on one side of each. The feet squeeze the sides together and everything clips together nicely without the need for any tools. Due to the design of these feet, multiple NexStar 2 enclosures can be stacked on top of each other, and the feet will nest together and hold a small tower of them securely.
 
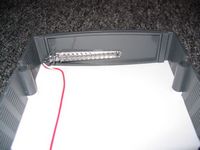
The images below provide a look inside the enclosure, and show that a small PCB is used at the back of the housing, and then a wire is run to the LED up front. This is the type of design I am used to, and why I was surprised by the large "C" shaped PCB in the Ultra Products device. The below right image shows the 4 plastic feet at various angles, as well as two molded rubber drive mounts. These rubber mounts attach to the hard drive, and then the drive is placed into the enclosure with no screws used to hold it to the case.
 
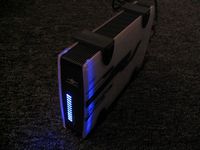
The lengths of the internal data and power cables, as well as the general layout of the components, made the installation of a drive into the Vantec case a little easier than on the Ultra Products case. The below right image shows the wire leading to a single LED attached to a clear plastic wedge. The LED glows a subtle blue when power is supplied and there is no drive activity, but when the drive is active the effect is pretty animated considering there is just one LED doing it.
 
The images below also show the slots molded into the sides of the housing. There is no fan on the NexStar 2, so all cooling will be handled passively via radiation and convection. The slots are narrow, but there are many of them, so hopefully the open area is enough to allow for good cooling.
The below left image shows the drive attached to the two rubber mounts. Two screws slip into molded holes, and align perfectly with two screw holes on the drive. The data and power cables are then connected, and the drive is slipped into the base of the enclosure. This design makes installation extremely easy, and should do wonders to reduce noise and vibration. The drive is held securely within the case, thanks to the contours molded into the rubber matching the internal features of the housing. Although the design is not fully tool-less, it is the simplest I have seen, and the added benefit of vibration isolation should be a nice perk.
 
Once the drive is in, the cover is placed back on, and the four feet are snapped into place. The assembly is held together extremely well, all in less than 10 seconds. The image below shows the full assembly in action. The front panel is where the wedge of plastic is located, and the design can create a bit of a blue 'Knight Rider' effect when the drive is active.

Please read on to the next page for more... Next
Page 1 | Page 2 | Page 3 | Page 4 | Page 5 | Page 6 | Home | Forum | Review Index
|
|