The Basics (continued):
As I mentioned before, the base is made out of copper. The base is perfectly smooth, and has a semi-mirror finish.

Finally, we have the included accessories. There are all the connectors necessary to attach this to either a screw/hole, or a hook Northbridge chipset. For a screw based Northbridge installation, you have two long screws, plastic washer, and nuts. If you have a hook based Northbridge, they have included tiny hooks and screws that secure it to the connector. As with any chipset cooler, you need some thermal paste, which Cooler Master has included. There is also a foam spacer that you need to use if your Northbridge has a raised die.

Installation:
Installation of the unit is not difficult, but does take a little bit of time. Depending on your current Northbridge heat sink, you might have to remove it from the bottom of the motherboard, which could mean totally taking your system apart. Of course if you have an Intel system that uses the hook system, you won't have to do that. Another thing to keep in mind is that motherboards based on the NForce 4 chipset will have the chipset underneath the video card, and the Blue Ice will not work! It appears that if you are going with an ATI Cross-Fire motherboard, the chipset is in a location where you could possibly replace it with the Blue Ice.
Here is the default MSI Northbridge heat sink. It is not very pretty, and is nothing special, just a typical aluminum cooler.
 
For motherboards where you need to use the screw based connectors, you will want to apply the thermal paste, set the Blue Ice into place, and then slide the connectors into the slots on the base. I found this to be a little difficult for one person to do. You have to put the screw on from the bottom, while holding the Blue Ice and connectors in place. I found that placing the motherboard across two chairs, so I would have free access to both sides of the motherboard without having to flip it over, was the easiest way to accomplish the installation. After getting the screws in place, it was just a matter of making sure the Blue Ice was properly centered and then I could tighten the screws. Using the Intel hook system, it might be a little easier to do this.
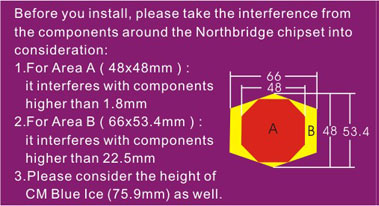
The Blue Ice is a large Northbridge heat sink and fan combo, so be sure you have plenty of room to install it prior to making a purchase. For the base, you will need a minimum of 48x48mm. For the main portion of the heat sink aluminum fins, you will need a minimum of 66x53.4mm, and a minimum height of 22.5mm. Finally you need to make sure you have plenty of distance from the case panel. The Blue Ice is 75.9mm tall! That is taller than some CPU heat sinks! Cooler Master has a nice diagram that will show you the amount of space required...

Here you can see the Blue Ice attached to the motherboard. It looks much nicer than the stock aluminum heat sink, even while it's powered off. Once you turn it on, the light from the fan really makes this shine.
 
The only minor issue I encountered was due to the size of the Blue Ice, and it really is a minor issue. The 4-pin motherboard power connector was pretty close to the Blue Ice. I had plenty of room to plug it in, and the wires were not pressing against the Blue Ice, but I did have to be extra careful when plugging it in.

Please read on to the next page for more... Next
Page 1 | Page 2 | Page 3 | Home | Forum | Review Index
|
|