| ATake Pipe VGA For Dual Heat-Pipe VGA Cooling Kit - Page 1 of 2 |
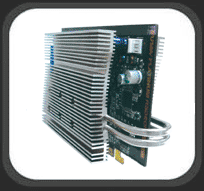
Almost all modern video cards now include fans in their designs. While fans help keep the video card cool, they do add to the noise level, not to mention when they get dirty they get even noisier. In some environments, such as Home Theater PCs, you want the quietest computer possible. ATake has introduced a video card cooling mod, the "Pipe VGA For Dual Heat-Pipe VGA Cooling Kit", which has been provided by Wisetech for testing on a BFG Technology GeForce 5200.

Specifications (taken from the Wisetech website):
"The ATake Pipe VGA for Dual Heat-Pipe VGA Cooling Kit improves on the functionality and aesthetics of your video card. Two extra long copper conductor tubes provide the greatest amount of heat transfer and help the VGA Cooler to displace the heat generated by the video memory, further extending the life of the card. As a dedicated VGA cooler, the Pipe VGA For Dual Heat-Pipe VGA Cooling Kit is fanless (OdBA), that is no cooling fan required and it’s designed for quick and easy assembly. So why leave your video card out of all the excitement?"
Overview:
• Fanless (OdBA). No Cooling fan required.
• Compatible with all graphic cards of nVIDIA AND ATI (Base Spring 2004)
• Two extra long Copper Conductor Tubes provide the greatest amount of heat transfer.
• Max thermal heat dissipation of 90W power consumption
• Max heat sink surface for total heat dissipation
• Designed for quick and easy assembly
Pipe VGA For Dual Heat-Pipe VGA Cooling Kit Information:
The VGA Cooler is packaged in a plastic snap together pack with the heat sinks, heat tubes, and other items packaged separately. The package is more than sufficient for shipping and will not cause any damage to the unit or other included items. When removing the heat tubes from the packaging, be careful not to bend them. If you do happen to bend them, be sure to put them back into their original shape before installation.
 
The VGA Cooler ships with all the necessary components, allowing this unit to fit video cards based on ATI and Nvidia designs. Included accessories include: both a large and a small main heat sink, two heat tubes, two tube clips, plenty of screws, a small back heat sink, two front side heat sinks (one for ATI and one for Nvidia chipsets), thermal paste, and brackets to mount the heat sinks. One important thing missing was a set of instructions. With the number of pieces and potential configurations, a set of instructions would be extremely helpful!

The images below show you a broad view of both sides of the main heat sinks.
 
The image below shows you an edge view of the main heat sinks.

Installation:
Installation is supposed to be simple, but I found it to be rather confusing. Even a picture of the front and backside in mid-installation would have been helpful. I would recommend putting this together without any thermal paste. Once you have the installation figured out, then go ahead and apply the thermal paste.
The first thing you will need to do is remove your current heat sink or fan from your video card (this could void any warranty). Be very careful when doing this. I would recommend removal while the card is warm as that will help loosen the thermal paste the manufacturer used. You can do this by quickly turning off the computer, and then removing what needs to be removed. Another option is to use a blow dryer to loosen the paste. After removing the manufacturer’s heat sink/fan, clean off any paste left on the chips.
After removing the manufacturer’s equipment, you'll want to attach the small heat sinks. This is the most confusing part of the installation. The smallest heat sink goes on the backside, with the copper stand-offs. Which bracket you use will depend on where the holes on your video card are. Nvidia cards seem to use the small brackets, while ATI cards need the large brackets. The heat sink on the backside of the card will NOT touch the card.
 
Please read on to the next page for more... Next
Page 1 | Page 2 | Home | Forum | Review Index | Page Views:
|
|
|
|