| Thermaltake Big Water 12cm Liquid Cooling System - Page 2 of 3 |
Installation:
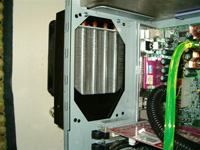
Installation of any water cooling kit is going to vary depending on your particular case and system configuration. Being that this kit is meant to be mounted 100% in or on the computer case, and the fact that the radiator/fan set up uses a standard 120mm fan screw pattern for mounting, having a case with a 120mm rear fan is a big help here. I planned on mounting the kit into the Raidmax Samurai case I recently reviewed, and since it utilized 120mm fans I figured mounting the radiator would be a very simple affair. If your case does not have a 120mm fan already, you had better plan on doing some case modding.
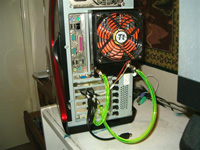
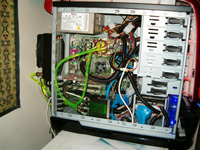
In my case it turns out I had to do some very simple modding. The Samurai case uses a bracket to mount the 120mm fan and therefore does not use the standard screw pattern. A few minutes with a drill and I had two new screw holes in the rear panel of the case to mount up the radiator. The instruction manual says the radiator can be mounted either inside the case on the rear panel, or on the outside mounted to the rear panel. Once again, the Samurai case design came into play here. Because of a ledge needed for the tool-less system for expansion cards, the radiator would not fit mounted on the inside of the case. This is really not a problem as I feel mounting the radiator on the outside of the case is preferable both to keep the heat out of the case and to give you more working room on the other internal components. It should also be noted that the radiator/fan comes set up to be mounted on the inside of the case, and when you mount it on the outside you need to flip the fan over to reverse air flow so the fan pulls air through the radiator instead of pushing it through. Mounting the radiator turned out to be the hardest part of the whole installation, as I imagine it will be for most. That said, it was not too difficult, and the results came out very nicely.
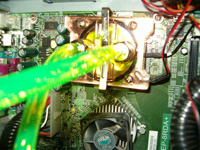
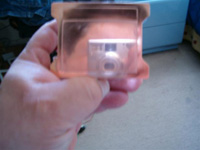
From this point on installation was very easy and straight forward. The water block mounted to the Barton 2500+ using a clip which locked onto all 3 lugs on the CPU socket. It held the block in place very well, and was very easy to hook to the socket. I did it using just my fingers so no worry of slipping with a screw driver. There is also a pig tail lead with a 3 pin connector to power up the LED under the acrylic cover of the water block. Unfortunately the LED on our test unit did not function. No amount of wiggling the wires, changing the lead to another fan header, or anything else I tried made the LED even flicker once.
When I first looked at the bottom of the water block I thought Thermaltake had really goofed up the finish on the bottom of the block. It looked terribly rough. It turned out to be a layer of some type of grease, so I cleaned it off with some rubbing alcohol and it turns out the water block has a very smooth, near mirror surface just as it should have.
The kit gives you two options to install the pump/reservoir. There is a tapped screw hole in the back of the metal bracket on the pump, or the kit comes with some Velcro to mount it to the bottom or side of the case. I went with the Velcro to start with and was surprised how well it held the pump in place even when it was filled and running.
Next step is to plumb the liquid tubing. This is very simple. Just cut the tube to the proper length and then thread it through the retaining nut, slide it over the barbed nipple and thread the nut into place. The Installation Manual tells you repeatedly not to over tighten these nuts as doing so may cause leaks. I tightened them fairly snug with my fingers and had no leaks at all. The liquid flow path goes from the pump discharge to the water block, from the water block thru the PCI slot pass thru plate to the radiator, out the radiator back through the PCI pass thru plate and finally back to the pump.
Next it is time to wire up the fan. The fan comes with a separate tachometer lead, a standard 4 pin Molex connector and what Thermaltake calls a VR connection, which goes to the fan speed controller. The fan speed controller fits in a PCI slot on the back of the case. There is a slot for the wires to get from the outside of the case back inside in the same slot cover that the liquid tubes go through. I set this all up, tested it, and it worked very well. After testing it out I modified it to fit my system a little better. I spliced the tachometer lead and the 4 pin Molex lead into one standard 3 pin connector and hooked it to a front panel fan controller that has a hardware tachometer as well as a hard wired temperature probe mounted beside the core of the CPU. Both set ups worked fine, but my modified set up offered more convenient access to the speed controller. Instead of reaching around the back of the case to a PCI slot, I now have access to fan RPM readings without using any software.
Now all that is left to do is fill the system with the cooling fluid and check for leaks. As per the Instruction Manual I laid the pump on its back so the vents were facing up and pulled the rubber caps off of them. I then hooked a section of the tubing to the lower vent hole on the refill bottle and filled the tank with the High Performance Cooling Liquid. Then I attached the other end of the hose to the pump, unscrewed the cap from the refill bottle, and lifted it higher than the pump to fill the reservoir. Then I plugged the lower of the two vent/fill tubes on the pump and stood it back upright.
The next step is not in the Instruction Manual, but I thought it was worth the time to be on the safe side. I hooked the 3 pin power connector from the pump to an old AT style power supply and powered it up to make sure I had no leaks and to get all the air bubbles out of the cooling system with out powering up the PC itself... There were no leaks at all. It did take a few minutes before I stopped seeing air bubbles flowing through the tubes, and I did have to shut the pump off and add more coolant to the system twice before I was satisfied that there was no air in the system. For extra convenience, the reservoir has a convenient line on it to show you when it is full.
There you have it. Although my description may have been some what long winded, the installation is really very simple and anyone who knows enough about computers to want liquid cooling should have no problems installing the Big Water Cooling Kit.
Please read on to the next page for more... Next
Page 1 | Page 2 | Page 3 | Home | Forum | Review Index
|
|
|
|


