In Use (continued):
SmartThings:
The KeyFob is not designed to work with the SmartThings hub right out of the box, but yet again the community has fixed that. A
device handler by ClassicGOD is what I am using. You can then approach configuring the buttons a few ways, including the use of WebCORE, or a SmartApp like Button Controller EXTREME. We'll walk through some of the basic configuration, where we will see that the controller will work just fine with SmartThings, but that the process is not as straightforward as with the Fibaro HCL.
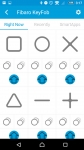
With the device handler installed on SmartThings before pairing with the KeyFob, the initial setup was very easy. The KeyFob was recognized properly, and as with the HCL it included a little icon that exactly replicates the look of the device. From there, you have the typical "Right Now", "Recently", and "SmartApps" tabs, and the Right Now tab is shown in the below middle image. What you see here is a fairly thorough soft-menu for all of the physical buttons on the KeyFob. This is not where you configure the buttons (it would be nice to have a graphical interface for that process), but it is where you can toggle the commands without the physical remote present. The Recently tab shows the early stages of my use of the device, where all I have done is sync the physical remote with the SmartThings software. As I see it, syncing is a necessary, manual step required when first setting it up and when changing the function of any buttons.


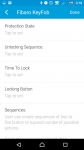
Digging in to the KeyFob settings, the first things we see are the ability to rename and change the icon for the device, as well as configuring the security features seen with the Fibaro HCL controls. You can set the time out duration (or a manual lock based on keystrokes), and then configure a code to be entered prior to the device being usable.

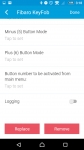
The SmartThings approach allows you to define the maximum number of clicks you intend to use, and whether you will use a press/hold actuation. This way, if you only intend to use single clicks, the device will not wait for additional clicks to possibly be entered. In these images you can see that this is configurable on a button by button basis, but I have chosen to set the "Button Mode" for all buttons to be "1&2 Clicks". This way it will never wait for a third click or a press/hold, so when it receives 2 clicks on a button it knows to act. If it receives 1 click on a button there is a slight delay as it waits to see if a second click is coming before processing that command.
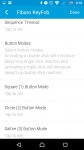

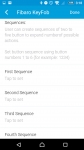
I have stuck with the Fibaro suggested approach of one click being "on" and two clicks being "off", and it works just well here! I don't have that many things I want to control with this right now, so having twelve combinations of commands is just fine for me right now. That said, as seen in the above right image I still have the option of creating sequences, where I can combine single clicks (square plus triangle, for example) on different buttons to actuate more commands. So, I can have more possibilities while still keeping all buttons down to one and two click operations.


