Assembly:
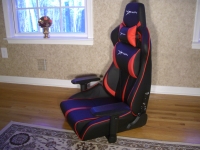
In this section we will cover the assembly of the chair, but first I want to comment on the quality of the seating surfaces. The base and back are very heavy duty and the first impression given is that they are very well made. The PU leather looks great, the stitching is very well done, and all the foam padding feels great and is very thick. The first step to assembling the
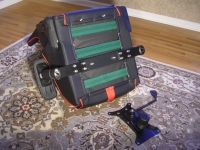
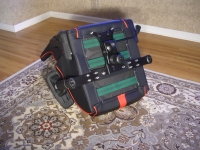
EwinRacing Flash Series chair is to bolt the base to the back, which requires the use of the four included Allen head bolts. The two images below show this step, and how it leaves the chair looking a bit unfinished.

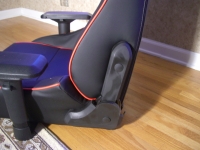
This unfinished look is only temporary, as there are plastic covers to screw on over the hinges, as shown in the images below. To be honest, these images show this cover on wrong, as the upper piece of plastic should be on the outside of the lower piece, and not tucked in as shown. This step was a little confusing, as the pieces provided didn't match the pieces shown in the instructions, plus the lower piece of plastic seemed to stick out too far to do it the right way. Never-the-less, I corrected the installation on this step, and both sides were covered, so as to conceal the hinge and assembly hardware. From a distance it looks fine, and the plastic covers function just fine, but in my opinion these pieces don't meet the same high quality standard the bulk of the chair's components seem to have. The plastic covers are somewhat flimsy, have a cheap plastic finish, and didn't fit as cleanly as I would have expected. Not a big deal, but considering how well done the seating surfaces and other areas were executed, I think just a bit more effort on these pieces would have paid off with an even better overall appearance.

The next step is to bolt the bracket to the underside of the seat, so that the gas cylinder can be connected and so that you can raise / lower the chair while in use. The four Allen bolts required are already attached to the bottom of the chair, so you remove those, put the bracket in place with the "Front" label facing the front of the chair, and then tighten everything back up.
The casters are all then pressed into their holes on the five star base, and the gas cylinder is pressed into the center hole - no tools required.

The last step is to press the five star base assembly in to the bottom of the chair. It all goes together very snugly, but having a seat on your new chair will help force all of the press fit components together completely.
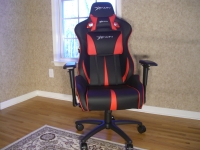
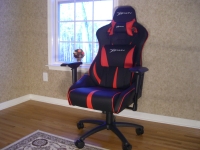
The full assembled chair looks sharp and very sporty. I think that the Ewin logo embroidered onto three locations on the front of the chair is a bit much, and that the chair would look much nicer if at least two if the three logos were eliminated. The neck and lumbar pillows are the location of two of the chair's logos and they both come pre-installed, but are merely attached with belts and clips, so they can be removed. Additionally, this belt system allows the pillows to be repositioned while in use, and the tension on the belts helps keep them in place, exactly where you would like them.


