Performance:
Controlling your HVAC system is incredibly easy through either the thermostat, apps, or web portal. The touch screen responds quickly to your input and menus are easy to navigate. The thermostat always displays the current temperature and outdoor temperature and weather icon. As you approach the thermostat the display will change, centered will be your current temperature with a humidity reading just above that. At the top of the screen there will be an icon for heating and/or cooling. If cooling is active the snowflake will be blue, if heat is active the flame will be red. To the right is the slider scale to adjust the current set point. On the bottom you have three options; starting on the left you have the menu, then weather, and finally quick changes. The quick changes tab allows you to quickly set the thermostat to home or away mode. The weather tab allows you to see current weather and forecast for the next couple of days. The menu tab allows you to customize the thermostat control and set alerts. I will cover these in more detail below.
What I found smart was ecobee designed the app to mimic the thermostat screens. While there are some differences it makes it so easy for you to make changes since they are performed the same way. The screen caps below were from the android app. After you get your app registered to the thermostat, you will see a screen as described above and shown below.
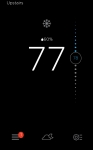
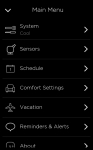
In the above case you can see the snowflake is gray indicating the A/C is not currently running since the room temp is 77F and set point is 78F. You also see a red 1 over the menu tab. This is indicating there is an alert. Selecting the menu tab will bring up the following screen. It is here you make your changes to customize how the thermostat works for you. If you select the System tab you have the option of changing the HVAC mode. Your choices are Off, Cool, Heat or Auto and they are simple to change by selecting from the drop down menu. Another nice feature is the Fan setting. In my home the thermostat is upstairs, which means the downstairs is always significantly colder than upstairs. So I can set the fan to run a minimum amount of time per hour to help mix or circulate this air throughout the home.

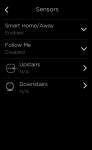
Selecting the Sensors menu will allow you to see real time info from each sensor you have connected to the system. The first drop down is for the Smart Home/Away feature. This is a nice feature for those that have a crazy schedule. Rather than trying to program this crazy schedule into the unit you can set a relatively simple schedule and let the motion sensors determine if you are home or not. If this is enabled it will override the schedule. For instance, say you are typically home after 6pm but you get stuck in the office. Rather than the thermostat maintaining your Home Comfort Setting it will sense no one is home and go back to Away to save you money.
The next drop down is for the Follow Me feature. This is a very novel idea. What this does is use the motion sensor to detect where you are. If there is motion in more than one location, the thermostat will average the readings to attempt to get a more comfortable temperature in all locations. Some will mistakenly think this means the unit can redirect heating or cooling; it can’t. No unit can do this without active control of your dampers. But here is an example of how this works. As I mentioned my downstairs is always colder than upstairs. Typically my A/C set point is 77F; but when it is this temperature often the downstairs is 72. If I am downstairs watching a movie there is no reason for me to pay to try to keep cooling the upstairs, so the thermostat starts to weigh the reading for downstairs higher than upstairs which makes the unit stop calling for cooling. Not only would this save you money but also keep you more comfortable.
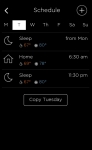
Going back to the Main menu you have the Schedule menu next up. Here you can see your current schedule for each day. You can also change the times for the start of each Comfort Setting but you can’t change the temperatures for the Comfort Settings here. In the top right you can add another Comfort Setting if you created any new ones.
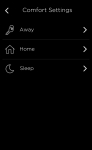
Again going back to the Main menu, the next menu up is Comfort Settings. It is here that you can change the temperature settings for each Comfort Setting and what sensors are to be actively used to determine your comfort. This is another nice touch. For instance, in my home the bedrooms are upstairs. So when I am in my Sleep Comfort Setting I want the upstairs to be at the set point.