Setup (continued):
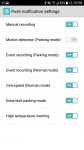
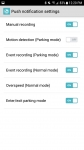
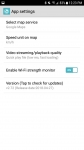
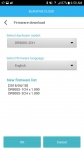
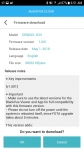
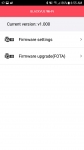
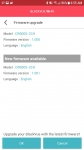
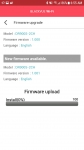
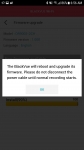
In the top right of the Wi-Fi screen you will see the Settings, selecting this gives you several options. Here you can sign in and out of your account, set notifications, app settings and update firmware. I was quite surprised to find that the DR900S-2CH already had a firmware update available. I know Pittasoft has been good at providing periodic updates but I figured a newly released device wouldn’t see an update for a bit. But luckily they make the update process easy and smooth. After you download the new firmware to your device you connect to the camera via Wi-Fi and go to the Settings menu and select Firmware upgrade, it shows the updated file and asks if you want to continue. Selecting yes it will upload the firmware to the camera and initiate a reboot. Done, that easy. Under the Push Notification section you can decide what events will create push notifications. But you do have to keep in mind this camera does not have internet connectivity on its own, so if you want notifications it needs to be connected to a hot spot. Under App settings you can select your map service, units for speed and what feed you want displayed. This is an important selection if you don’t have unlimited data or slow cell service. While the camera records 4K and does a great job at compressing that feed using H.265 it would still overwhelm many connections, so utilizing a sub-stream will give you faster loading with reasonable resolution (about 480p).
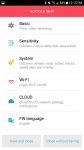
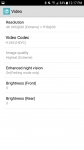
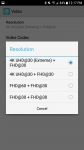
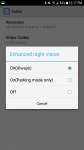
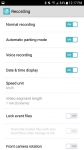
Going back to the Wi-Fi main screen you will find the Settings icon in the top right. Selecting this gives you the ability to enter the Firmware settings. Here you will find a plethora of settings for you to tweak and play around with. I won’t go through all of them but I will give an over view of the ones I found most useful. You have several submenus to utilize, the first is Basic. Here you have the some of the most important controls. Besides the date and time options you have your video settings. Under resolution you can set the resolution of the cameras, codec used, control night vision and adjust image brightness. Under recording you have ability to select when you want the device to record, enable locking of Event files (which is crucial) and rotation of cameras in case you had to flip the camera to fit your mounting needs. It should be noted that the bit rate will vary not only with the codec you choose but also with the the quality setting you pick. For instance; if you are using H.265 you would have the following bit rates: Extreme 25Mbps front/10Mbps rear, Highest 12/10, high 10/8 and normal is 8/6. Some may ask why they allow you to use H.264 since the file sizes would be much larger, but there is a good reason for this. They offer this option because not everyone will have hardware capable of playing back the H.265 files since they will require hardware acceleration.
Under Sensitivity you can set the thresholds for each axis, front to back, side to side and up and down. These can be set for Normal mode and Parking mode individually which is great. For instance if I set the sensitivity low enough to pick up someone bumping my car with their door or something my entire commute would be an event due to the potholes I hit every 10 feet. So you can set it low in Parking mode and higher for normal driving. Here you can also adjust the motion sensitivity for the Parking mode.
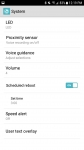
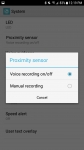
Under System you can control other aspects of the device like LED operation, voice alert volume, speed alerts, auto reboots and most important to me configuring the proximity sensor. Default mode for this is to enable/disable voice recording. For me I would like voice recording to always be on, but I would like a way to easily flag times in my commute when someone is being a jerk. If you set this for manual recording, the next time you see someone driving down the shoulder you can wave your hand and be able to find the file easily when you get home. Very convenient.
Under Wi-Fi you can change your SSID and password and enable auto Wi-Fi and auto shutoff.
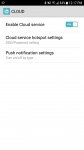
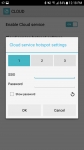
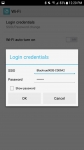
Under Cloud you can choose to enable or disable the remote Over the Cloud viewing. But as mentioned previously this does not have cell service itself so it needs to connect to a hotspot. This can be your vehicles hotspot or any mobile device that is capable. Under the Hotspot tab you will be able to save your network credentials. You also have another tab for the Push Notifications. There you set what alerts you want pushed to your device.

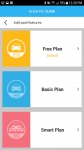
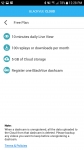
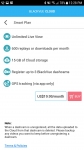
Once you have the app installed and settings configured you can create a Cloud account which they have three levels; free, basic and smart. Each plan varies by amount of live viewing per day, cloud storage etc. but the differences are clearly communicated as can be seen in the screen caps below. For me I picked the free plan mainly because while the live view is pretty cool I do not have a truly unlimited data plan. So it is likely if I used this too much I would end up throttled or paying extra fees. After you register your email account I registered the camera itself to the account. This too was super easy. You simply slide the main camera out of the holder and scan the QR code that is hidden.