In Use (continued):
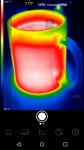
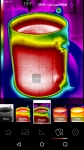
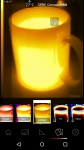
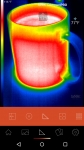
The next few images are still screenshots from within the app that are intended to show off the layout of the controls for the thermal imager, as well as what the visible world will look like through the Seek Thermal sensor. The below left image shows the interface while looking at a mug of hot coffee. The device is set to use the Spectra color palette, and the device is set to tag the high and low temperature in the field of view. You see there is a white circle you tap to capture an imager (much like a normal camera) and along the side you have a band of color that provides a roadmap to understanding the colors seen in your image. White is the hottest and black is the coldest, and in between the Spectra palette uses the full spectrum of colors to take you from cold to hot. The other two images in this row show the rest of the color palettes available, while looking at the same mug while using the Prism and Amber modes.
The next two images are of the same scene, but now I have toggled the menu along the bottom where you can do more than just change color palette. You can set it to detail the spot temperature, high / low temperature, level and span, above threshold, below threshold, equal threshold, and thermal plus visible. I found that I most preferred to either use spot temperature (where one centrally located temperature is detailed) or high / low (where the high and the low temperature within the field of view are detailed.

These modes were also quite often used in combination with the "thermal plus visible" mode, which splits the screen while in use, showing the left half of your screen as visible light imagery and the right side of the screen as thermal imagery. This mode is accomplished by using your phone's built in camera for the visible light imagery, and is quite useful, although it does introduce some challenges. Since your phone camera is not in the same location as the thermal sensor, you have to adjust it, and the app makes that fairly easy. Since you are only using 320x240 of your phone camera's total resolution, you should be able to align that small area to match what the thermal imager is seeing. Just tap the visible light portion of the screen and drag it until what you see on the left seems to line up properly with what you see on the right. You want the screen to look like the object you are taking a picture of, just that one side will be 'normal' looking and the other side will be colored based on temperature. For example, using the split screen on my coffee mug, I dragged the left side of the screen around until the edges of the mug lined up with the thermal image edges of the mug. It is not a perfect approach given the different angles, but it is very easy to use. While the image on screen is split, when you click to take a picture, you actually get two full field of view images - one from your camera and one from the thermal imager.
The balance of the "In Use" section of this review will take a look at real world situations where a thermal image could definitely come in handy. I use the "thermal plus visible" setting, and typically had the camera in high/low mode. For most cases, I will also include a full resolution image of the scene in question using my digital camera, just because it makes things easier to understand when you have more than 320x240 resolution as I try to describe what we are looking at.
Hot Water Pipe Insulation Analysis:
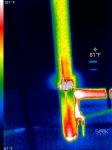
In this test case, I wanted to check out some hot water piping I had recently insulated. Wrapping exposed pipes in insulation is a great idea, as it will hold the heat in the water better. I probably covered 50+ feet of 3/4" pipe that was exposed in my unfinished basement, and the only areas of uninsulated hot water pipe was now at the elbows and at the places where it was strapped to the floor joists. The full resolution image below shows the scene... A propane pipe, a hot water pipe, a cold water pipe, and a big mess of wires. You can see a bit of exposed hot water pipe at the clamp and at the elbow.
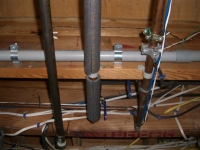
The below left image is what my phone's camera captured of the scene at 320x240, while the below right image shows what the CompactPro thermal imager saw. At the gap in the insulation where the plastic clamp is, you can see that the exposed pipe is at 122 degrees F. While I wish it was all covered, I am happy to know that 95% or so of all my exposed hot water piping is now covered, and in those areas the skin temperature is much lower. What is actually hard to see in the normal light imagery is that the hot water pipe turns 90 degrees upward, then 90 degrees to the right... The thermal imager reveals this quite well, and points out a run of uninsulated hot water pipe that I will have to cover! This foam insulation is very cheap and easy to install, and it will definitely keep my water hotter and lower my Propane consumption!