Installation:
For the installation portion of the review, the following components were installed in the
NZXT H2 Classic Series Silent midtower case:
» EVGA P55V 120-LF-E651-TR LGA 1156 Intel P55 Micro ATX Intel Motherboard
» Intel Core i3-540 Clarkdale 3.06GHz LGA 1156 Dual-Core Processor
» ARCTIC COOLING Freezer 7 Pro Rev.2 92mm Fluid Dynamic CPU Cooler
» CORSAIR XMS 4GB 240-Pin DDR3 SDRAM DDR3 1333 Desktop Memory
» EVGA GeForce GT 520 (Fermi) 1GB 64-bit DDR3 Video Card
» OCZ ModXStream Pro 600W Modular Power Supply
» Seagate Barracuda SATA 3G 7200RPM 500GB Hard Drive
» LITE-ON DVD Burner


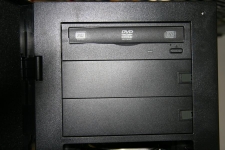
The first thing I installed into the NZXT H2 Classic Series Silent midtower case was the DVD Burner. No tools necessary, just remove a 5.25" device bay cover and slide the drive into the open bay. Once it is flush with the front panel, lock the device in place with the NZXT tool-less clip.
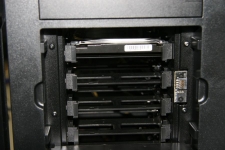
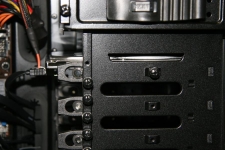
The next item to install was the Seagate hard drive. I had already put it in the 2.5/3.5" device tray, so all I needed to do was remove the front fan and slide it in (as shown in the below left image). The below right image shows a view of the inside of the case with the installed hard drive. I did use one of the many black thumbscrews to hold it in place, but I see it as optional, since the drive is held in place with the tray.
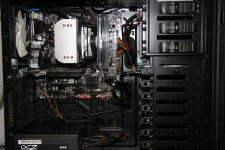
The image below shows everything installed into the H2. Installing the motherboard was simple, especially the CPU heatsink/fan. After I secured the motherboard with standoffs and screws it was easy to install CPU heatsink/fan thanks to the large square cut out in the motherboard tray. After that I placed the power supply in and secured it with some black screws. Then I added the necessary modular cables for what I needed to power. The 25mm behind the motherboard tray and case side panel proved to be a nice touch, and I used it to hide just about every extra inch of wire that I didn't need to see in the main area of the case.