In Use (Adding Devices):
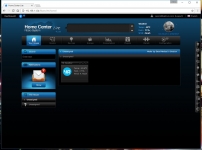
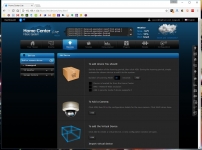
Once in to the system to get started, I will admit that I was a bit intimidated... But that quickly passed! The below left image shows the home screen of the web interface with nothing added yet, other than their default weather service plugin. The menu strip along the top (just below the Home Center Light logo) is where you will do most of your navigating, but the menu along the left column (which will grow as devices are added) will also provide you direct links to where you may want to go. Next to the Your Home icon is a Rooms icon, where you can add the different rooms of your house so you can designate devices to these rooms. Next to this is the Devices icon, where you will go to see your devices, as well as to add/remove devices. Next is Scenes, which is used to automate your devices to work together as well as to work with other features supported by the HCL. For example, make the outside lights come on as your phone approaches home, or make other lights in the house come on based on a the triggering of a Z-Wave motion sensor. The Consumption tab will let you monitor real time and historical HVAC and energy consumption data, if you have connected monitors installed. Plugins are next, where you can let the Fibaro HCL interact with other things like Foscam cameras, smart TVs, or other weather services. The Panels tab is where you can configure things like the alarm panel, or nice add-ons like the SMS panel which will let you send text messages based on certain triggers. Configuration brings you back to device configuration, and most likely won't be visited too often once setup. We'll make the next step in this tour a look at pairing a Z-Wave device to the Fibaro HCL, and as shown in the below right image, we have clicked on the Devices tab and then clicked "add or remove device". You are then presented with a page where you can add a Z-Wave device, add a camera, add a virtual device, or remove a device.
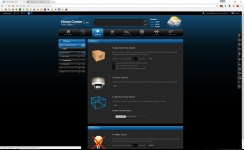
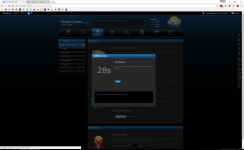
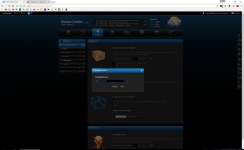
You can configure a few variables when adding a Z-Wave device, like whether they are near or far to the hub and how long to continue trying to pair, but the options are not specific to looking for any particular device. Many other hubs require you to say what you are looking for, and then you include it... Here it is very easy, just look for something, and if it finds something in pairing mode, it will add it! The below left screen shows the pop up you get while trying to add something as it counts down from the default 30 second time frame. Within a couple of seconds it found the device I was trying to add in this instance (a Zooz Z-Wave valve), and I was presented with the below right image which confirms it is configuring the device.
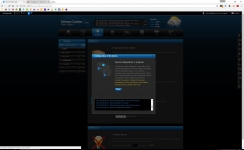
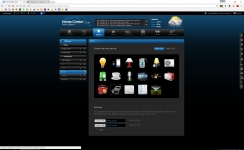
The below left screen has us back on the add/remove device tab, but the key here is that the upper grey field on the page is no longer blank... It is something like a news ticker that scrolls through updates as they happen. Here, it is confirming that it has just added something. In many cases the Fibaro HCL will know exactly what has been added and it will let you proceed rather quickly to the final steps. In this case, it has an idea of what type of device is added, but it doesn't not explicitly recognize it and will let you configure it more. The below right screen shows the system prompting me for what type of device this is.
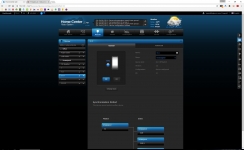
A valve is a bit like a switch, so I can see how it may see the open / close controller as an on / off controller. You can share your configuration files with Fibaro, so perhaps eventually they will be able to recognize a Zooz valve as such, but I liked customizing it myself (which you can do even if they tell you what the device is). On the below left page you can say what the device is, where it is located, and on the advanced tab configure many other features that for the most part don't need to be touched for basic devices. You can also change the icon for the device, so for this one I created my own set of icons for open and closed, and uploaded them through the page shown in the below right image.
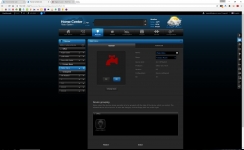
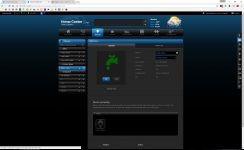
So, now the off position of the switch is the closed position for the valve, and it is represented by the red valve icon in the below left image. The open position for the valve is indicated by the green valve with a drip icon shown in the below right image. The device can now be toggled from the web interface and mobile apps, and it is also available for scenes, such as one to turn off the water if a connected leak sensor detects water!
The above example shows a more involved addition of a device, which was not complicated at all. For most devices, the function was known at the time of pairing, and an appropriate icon was automatically assigned. Adding each device was a simple matter of pairing, then assigning to the appropriate room, and associating to desired scenes. Adding my devices never took more than a few minutes per device, and everything went quite well.


