Software:
For this particular line of Ballistix modules, Crucial has come up with a handy monitoring utility for keeping an eye on your memory. While it is still in beta, it works quite well. We did have a few problems getting it to run on our AMD test system, so we installed the software on an Intel based system and everything ran fine. To be fair, these modules are not marketed to AMD users, per se, as XMP is an Intel technology. Why they would generate .NET errors on our test system we're not sure, as of today we are still working with Crucial to figure that out. The thermal utility, known as the Ballistix MOD Utility, can be found
here in both x86 and x64 flavors with support for Windows Vista and Windows 7. Since the newer chipsets do not officially support Windows XP, we can only assume that the utility does not either.
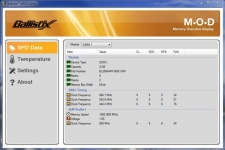
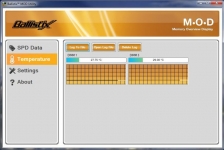
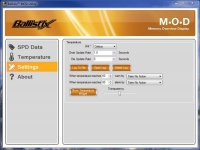
Below are two images that show you what things you will be able to monitor with Crucial's software. As you can see in the below left image we have all the technical data on the module in RAM slot #1, and according to the sensor it's running at stock speeds. Clicking the drop-down box will allow you to see all of the installed and supported modules. The image on the right shows you the temperature monitor. According to the readings, we're running just a bit above room temperature.
Crucial sent over a new version of the Ballistix MOD utility which is just about ready for public release. We first tried it in our AMD setup, and while it didn't crash on us as it did previously, it did pop-up a message stating "Motherboard not compatible". When tested on our Intel rig, we noticed that nothing had changed in the SPD Data or Temperature tabs (although a red max line was added to the temperature graphs), the biggest change was on the settings tab.
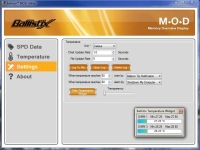
As you can see from the below left image, you can now dictate behaviors based on maximum temperatures reached. The below right image shows you that you can set the option of popping up a warning balloon, and then ultimately shutting the computer down at two distinct thresholds. Also shown in the bottom right corner is the new Temperature Widget which will still run, should you choose, independent of the utility. Unfortunately, we were unable to find a way to incorporate it with Windows Gadgets - but we're not so sure that's a deal breaker for a lot of people.
 Configuration and Overclocking:
The system to be used in this review features the following components:
» AMD Athlon II x4 630 processor with a Cooler Master Hyper 212 Plus heatsink
» Gigabyte 880GM-UD2H uATX motherboard
» Western Digital WD2500 Caviar SE SATA drive
» nVidia Quadro FX1800 PCIe video card
» Cooler Master EPS 12V 750 watt power supply
» Windows 7 Ultimate 64-Bit operating system
Our test system ran on an open bench in a room with an ambient temperature of 26 degrees Celsius.
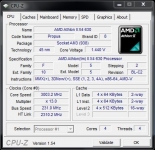
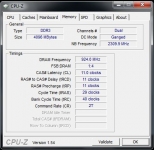
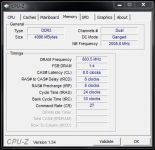
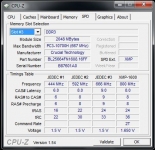
As you can see from the screen shots below, we have the Ballistix kit set to 8-8-8-24 and actually running at 1607MHz. the image on the right shows us what has become quite commonplace with some of the 1600MHz RAM we've seen. CPU-Z is reporting that these are actually slower 1333MHz chips running at a higher speed and with tighter timings.
For comparison purposes, we will pit our
Crucial Ballistix thermal sensor finned kit against the following dual channel modules:
» Kingston HyperX 1600MHz 8-8-8-24
» Elpida PC10600 1333MHz 9-9-9-24
» OCZ Technology Obsidian 4GB PC12800 1600MHz 9-9-9-24
We will also be doing a mild overclock on this kit and comparing those results. While we are by no means overclocking gurus, we will simply do some minor front side bus and timing tweaks to give you a taste of what these modules are capable of. As you can see from the two images below, we dropped the multiplier from 14 to 13, relaxed the timings a bit, and raised our front side bus to 231 MHz without any real effort or change in voltages.