Installation:
The Noctua NH-C12P CPU cooler was installed in a system with the following components for this review:
» eVGA X58 SLI Micro Motherboard
» Intel Core i7 Quad-Core 1366 CPU
» OCZ Technology SLI-Ready 2GB DDR3-2000 Memory
» BFG Tech GTX 285 1GB OCFU Video Card
» Western Digital Scorpio 320GB SATA 2.5" Hard Drive
» Cooler Master Silent Pro 700W Power Supply
» Lian Li V351 HTPC Case


Installing the Noctua NH-C12P CPU cooler was rather simple with the SecuFirm™ mounting kit for LGA1366. The motherboard does need to be removed so you can install the bracket underneath the CPU socket. The spring-loaded screws really secure the cooler to the mounting hardware; these need to be screwed until they won't go any more, which is pretty tight. In the below right image you can see the translucent rubber piece between the fan and the heatsink which prevents vibration noise.
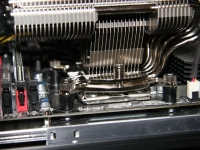

It was definitely a tight fit to install the cooler in a Lian Li V351 case. From my measurements I had 130mm from the motherboard to the power supply, and 122mm from the motherboard to the top of the cooler with fan installed. What I didn't notice when I first tried to slide the motherboard in with the cooler and fan installed was that the part of the case that supports the power supply got in the way. I needed another 3-4mm to be able to slide the whole thing in. So I ended up removing the fan, then slid the motherboard into the case, and then reattached the fan to the cooler. There are two metal clips to hold the fan in place. These clips were very hard to install with this case, although not impossible. Notice how much space is between the 120mm fan and the power supply, pretty tight fit!
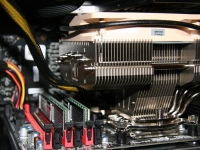

In a case like this it might be a good idea to reverse the direction of the fan. Instead of having the fan blow down across the cooler like one would typically do, it should probably be aimed upward. This will draw air through the cooling fins and pass it up to the PSU's fan to be carried out of the system. If you have it blow down, you not only don't have much open air to draw from, you are fighting the intake on the PSU.


