External Examination (continued):
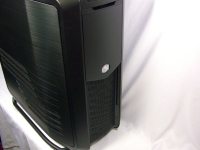
Moving on we see the front of the case, with another sliding door. In this view the solid panel with the Cooler Master logo is the door we are talking about, and it is in its upper most position which reveals the mesh surface on the bottom. This mesh is directly in front of a large intake fan that will cool your whole case, but most directly a good number of your 3.5" drives.
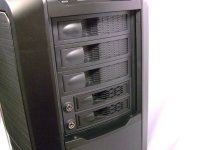
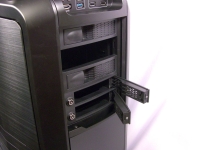
Next we see what is revealed by sliding the door to its lower most position. There are three 5.25" drive bays which look like some sort of hot swap cage, but they are really just blanks with handles for easy removal. Below these are two 3.5" drive bays which do feature hot swap bays complete with locks. In the below right image we see one of the 5.25" bay covers removed, as well as both 3.5" bay doors opened.
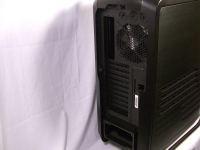
Next lets swing around to the back of the Cosmos II, where we see that even this area has received a good deal of attention befitting a higher end chassis. In the below right image we see three liquid cooling pass-through holes just above the large exhaust fan. Taking a closer look reveals a single thumbscrew just below the top of the case... This is all that has to be removed in order to take the top cover off in order to add / changes the cooling fan configuration. As is, there is a single fan in place, but this can be changed and you can add an additional fan. What I found useful is something completely different. I have a Logitech Easy Call wireless mouse and keyboard combination that uses a huge base station that includes a speakerphone that I never use. I like the keyboard and mouse, but the base station is a pain. With this case, the base station can actually fit under the top cover above the blank spot for the optional cooling fan, and its USB cable can be run out through one of the water cooling holes for a very clean and unobtrusive installation!

Moving down the back of the case we find a total of ten expansion slots, all with attractive, ventilated covers. There is even an eleventh expansion slot off to the right, which would be good for USB/Firewire expansion cards that do not require a slot on the motherboard. Below this is a bumped out bracket where the power supply mounts. You install the PSU from inside, with the fan facing down, and we will see more on that once we move inside the case.


