| View previous topic :: View next topic |
| Author |
Message |
jedihobbit
Rated XXX

Joined: 22 Mar 2007
Posts: 238
Location: Central Virginia, USA
|
 Posted: Fri, 04 Apr 2008 17:02:58 Post Subject: DreamCatcher v2.0 âWorklogâ Posted: Fri, 04 Apr 2008 17:02:58 Post Subject: DreamCatcher v2.0 âWorklogâ |
  |
|
I have a large build called Celtic Spirit that has once again been placed on indefinite hold. This, wanting to bring DreamCatcher into the realm of AM2, and seriously taking a look at water-cooling, I made the decision to move on to v2.0. My initial W/C design and issues may be presented in another thread (got to get that going!) and if there is an interest, my testing & ocâing of the DC v2.0âs mobo/cpu assembly on air can have a thread done. Then as each area starts converging for âcompletionâ they can be merged with this one.
Here are the major component changes that helped me to decide to call it v2.0:
Case: Convert MicroFly to MX6 âHybridâ
Mobo: Abit NF-M2 nView
CPU: AMD 4000+ Brisbane
HSF: Zalman CNPS8700
Memory: Corsair CM2X1024 â 6400C4
These components were in the pipeline long before the idea of water-cooling came along therefore running the system on air influenced the original update.
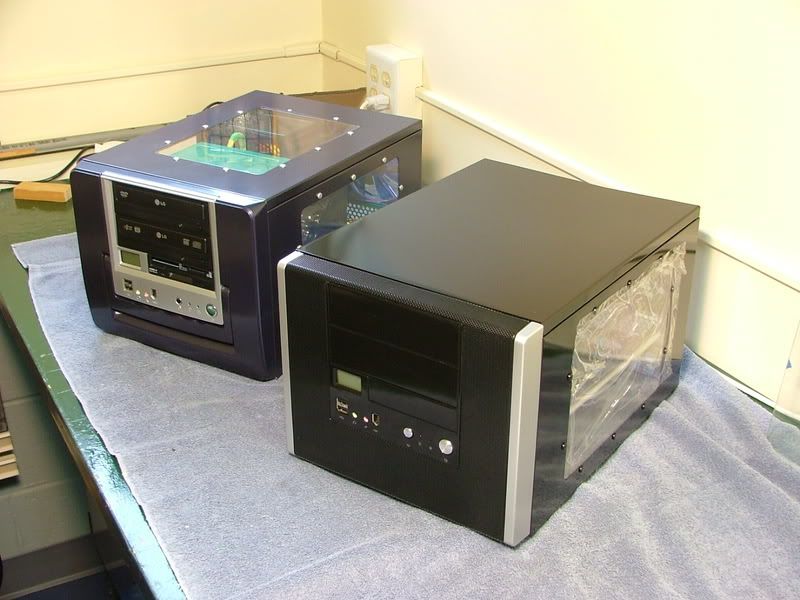
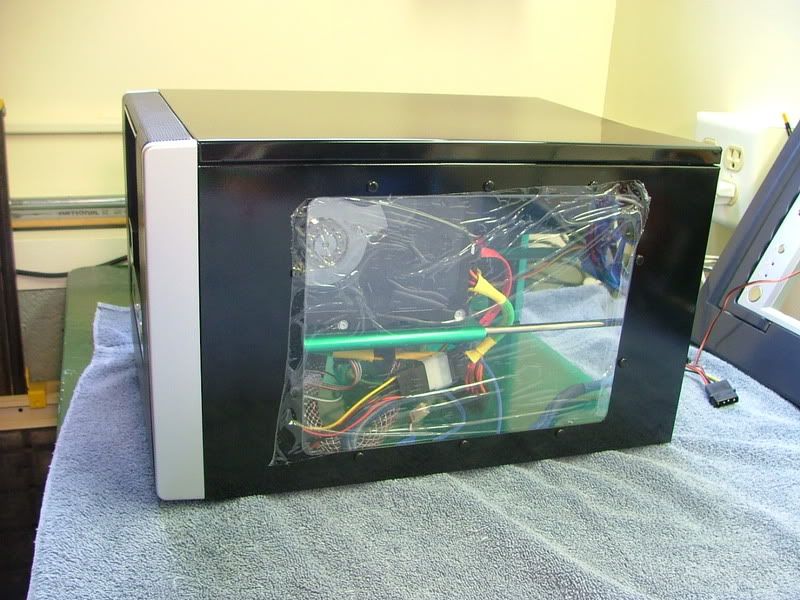
Case Conversion: While I love it, Ultraâs MicroFly case has a couple of âflawsâ. One of which was airflow. Even though it uses a 120mm exhaust fan, intake is a little limited. The front of the chassis has a lot of holes and an 80mm fan, but the front bezel is somewhat restrictive for air intake. The MX6 was the next version of the chassis design and fixed that problem. The bezel uses a mesh surface that is very âbreathableâ and solved any restrictive airflow issues.
I had won a MX6 was about to sell it when I realized I could swap the exterior pieces to give DC better cooling â it just took a while to get around to doing that. Also as e-bay would have it I ended up with an nView, so in late February I startedâ¦â¦â¦
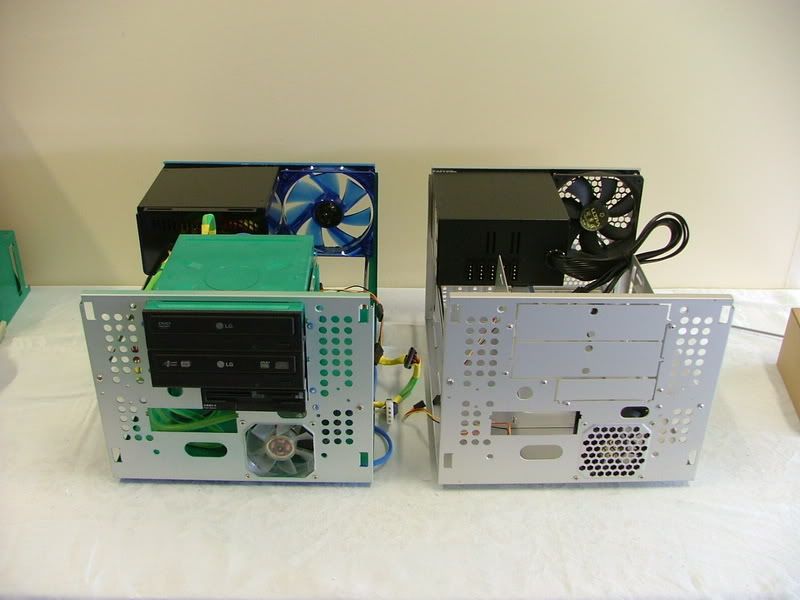
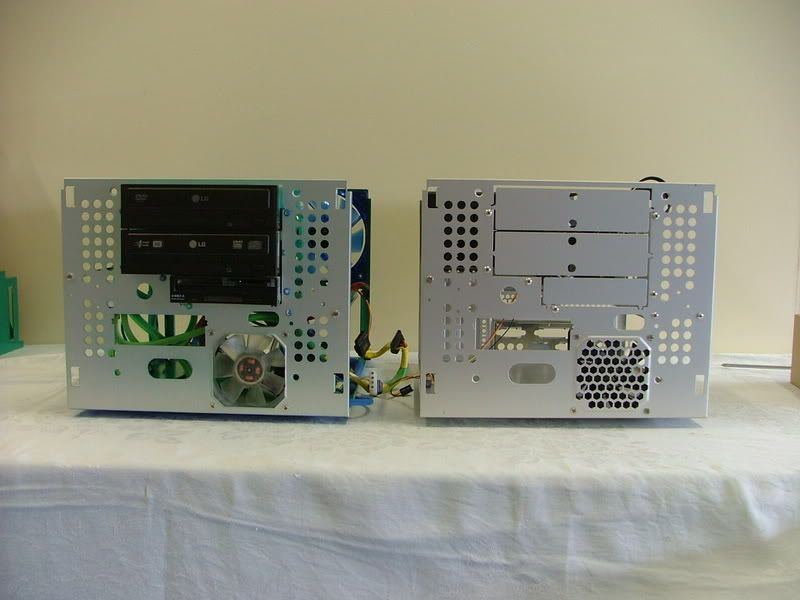
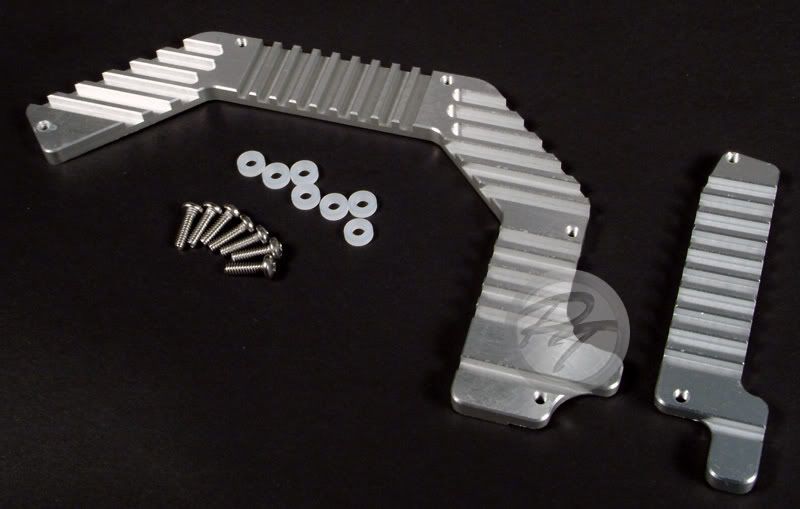
Here sit the two boxes waiting to be âhybridizedâ and then with everything removed but the bezels.
 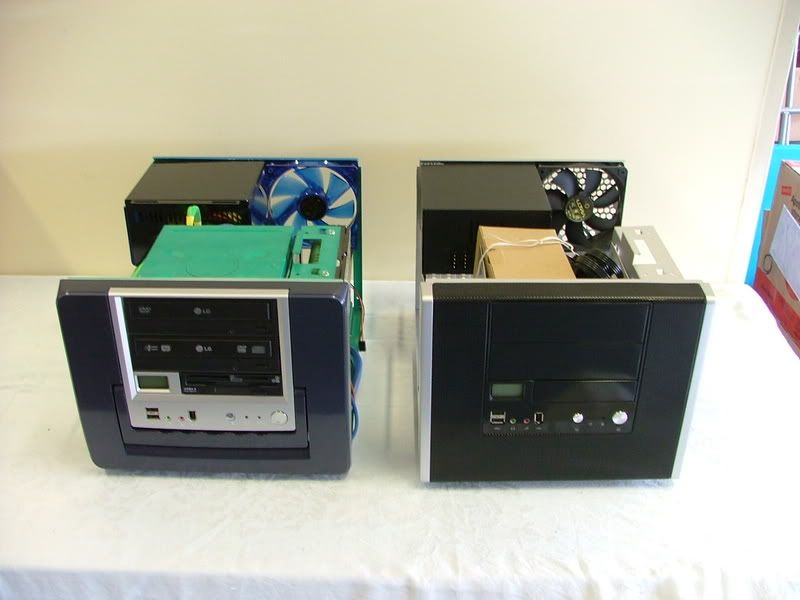
It was interesting to note that when I started taking the boxes apart Ultra opted to drop the four mounting screws used in the MicroFly and rely solely on the four retention clips with the MX6. Admittedly it makes life easier as one does not have to remove the HDD tray and the requirement for a short screwdriver if a PSU is in place. Here we have two views with the front bezel removed and finally a side view with everything together.
The left over chassis and exterior parts are headed for a build called Yodaâs SMN, originally an attempt at a home server build (or excuse to build another computer!).
As one that does a lot of his stuff based on the âblingâ factor, Iâm going to miss the top window (may do one at a later date) but was compensated by the fact the new case matches my new office furniture the wife decided I needed! It is black with pewter knobs so
 
Sad isnât it!  
The rest of the stuff was the result of e-bay (whatâs new) and a few âFor Saleâ threads here and there. Initially I was going to update DC by using Celtic Spiritâs Opty 175 and G. Skill PC-4000. Then it was decided to have a contest to see which would perform better Biostar / 175 or nView / 4000+ Brisbane. However after the frustration of reinventing the wheel (couldnât get it through my thick skull 2 x 512 will always out perform 2 x 1024), ending up with an Opty 170, and running out of time it was decided to go with the theoretical ocâing ability of the Brisbane. It was decided to test the nView / 4000+ using a Tech Station I had modded for all kinds of altruistic reasons.
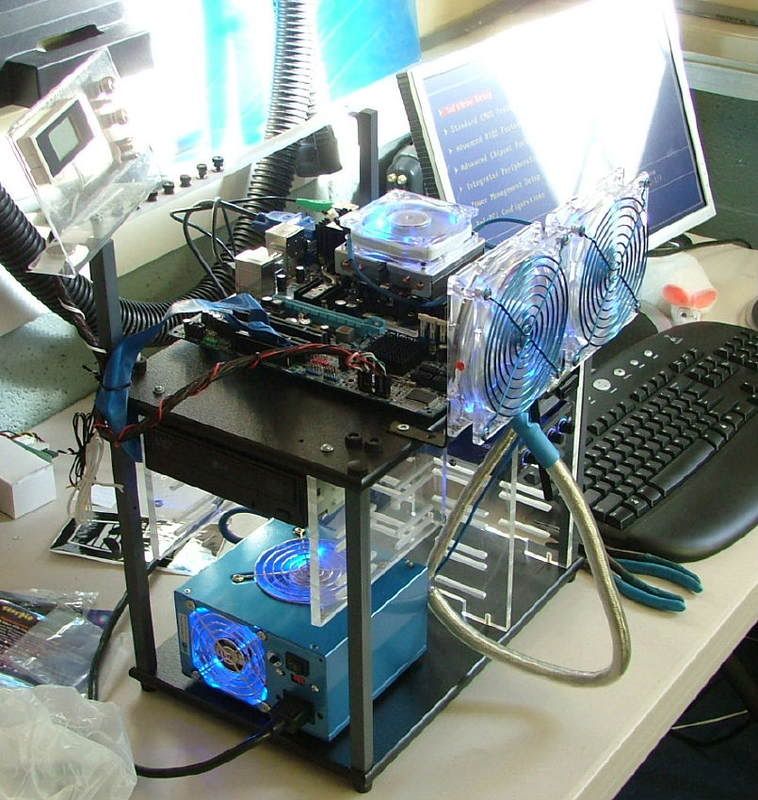
Besides swapping box parts I threw the mobo assembly and Tech Station together. With fingers crossed and my eyes shut I pushed the power buttonâ¦..
and was immediately reminded of two things:
1. the board was open box âYou will need to reset you bios as the cpu has changedâ
2. I need to flash the bios to correct the Brisbane temperature issues as I was showing 51 C for idle in the âHealth Status Screenâ
So now was time to stop the physical assembly and begin the testing and ocâing. As mentioned above I can do a thread for that if there is an interest.
Chow for now! |
|
| Back to top |
|
 |
jedihobbit
Rated XXX
Joined: 22 Mar 2007
Posts: 238
Location: Central Virginia, USA
|
| Posted: Tue, 15 Apr 2008 03:16:39 Post Subject: |
|
|
This will be the first entry where the overclocking and water cooling parts of this project are now going to be part of the primary worklog.
For all intents and purposes the overclocking part (on air) is finished. After the water cooling has been installed and the system has gone through a âshakedownâ period further ocâing may be attempted.
So this is what the final settings are:
HTT: 291 for 3.06GHz
Vcore: 1.450v
Vdimm: 2.1v
Chipset Vcore: 1.24v
Hypertransport V: 1.22v
Rm temp is 22Cish, CPU 54C, Core 23C (per SpdFan)
This was backed up by a 12+ hour run of Prime.
While the setting didnât run âstableâ (long term prime or equal) did have on late night S & Gs session where I was able to run PCMarks â05 and CrystalMarks at
HTT: 299 for 3.14GHz
Vcore: 1.500v
Vdimm: 2.1v
Chipset Vcore: 1.24v
Hypertransport V: 1.22v
PCMarks = 7436
CrystalMarks: ALU = 23308 / FPU = 25523 / MEM = 16397 with a TOTAL of 129348
Now here is the summery of the WCâing thread and whatâs happened!
In the end it was decided to go with aqua computerâs âplug & coolâ fittings and not compression. It was felt that in the tight spaces of the mATX layout they would make installation easier.
In the final configuration it was decided to drop the NB and Mosfet coolersâ¦..financial issues and the sinking dollar being the major considerations. It also didnât help the NB cooler would be âhiddenâ under the PSU. As it turns out all major components are from Aqua Computer
Went for a combo 1 â 2 punch to cover rad, pump, res, etcâ¦.that will be handled by a Aquaduct 240 PRO Mark II . As Iâm using ACâs plug & cool the tubing will be 6mm x 8mm with clear on the mobo and I believe black and gray (comes with the 240) from the 240 Pro.
Then for the CPU: cuplex XT di and then for the GPU: twinplex pro for FX8800 .
The cuplex XT di and a few fittings came from a state side e-tailer but the rest is coming from Berlin and shipping is â¦.. OUCH!
Anyway looking at the following loop: 240 >> CPU in >> CPU out >> GPU in >> GPU out >> 240
The following pictures are just things that Iâm doing while waiting on the balance of the stuff to arrive.
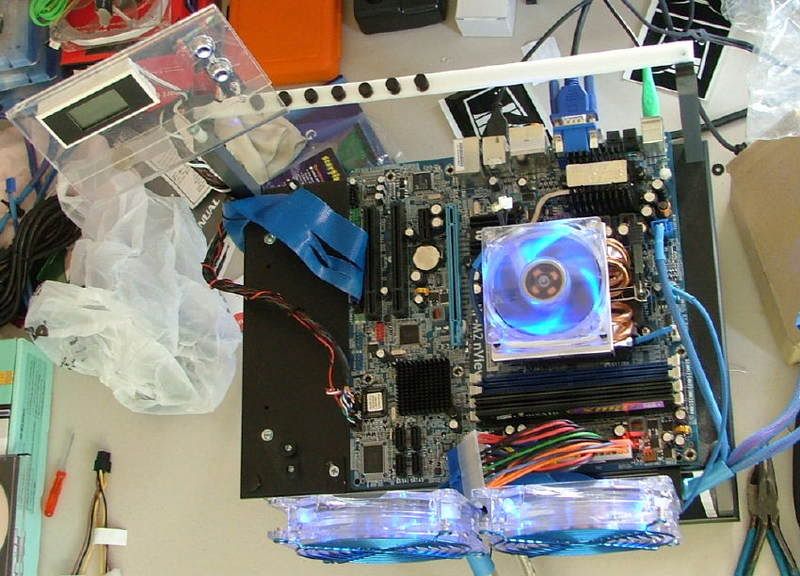
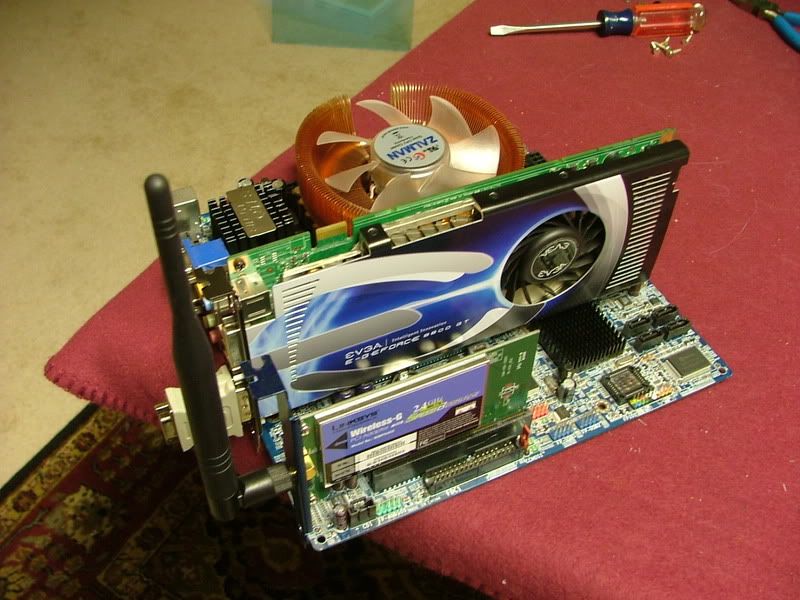
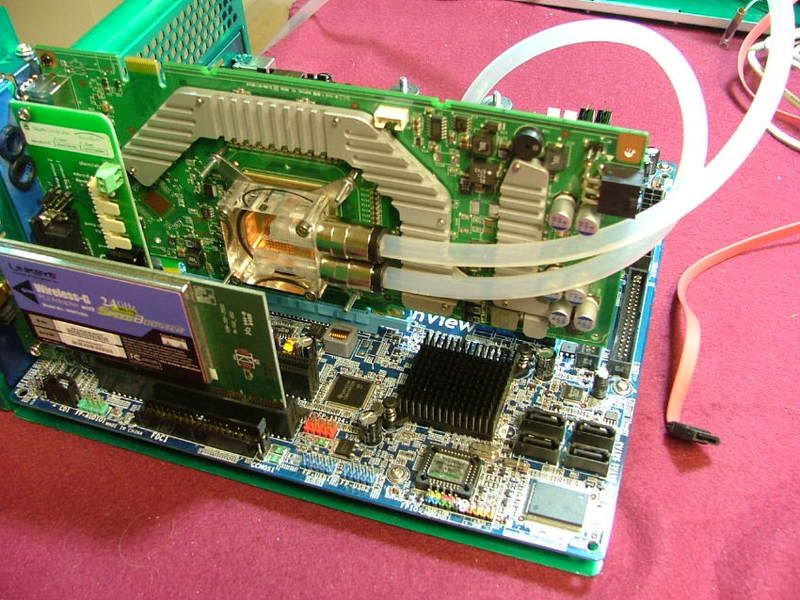
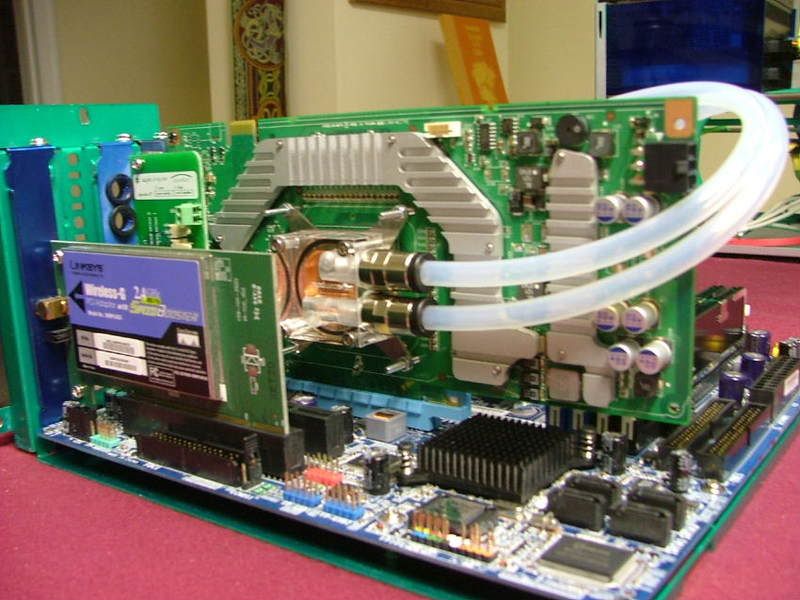
Here we have the last views of the mobo assembly on airâ¦.
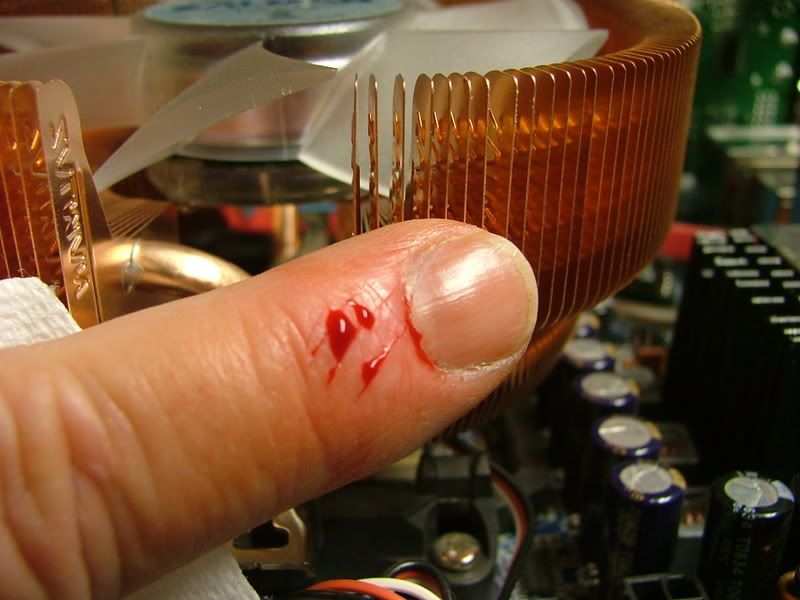
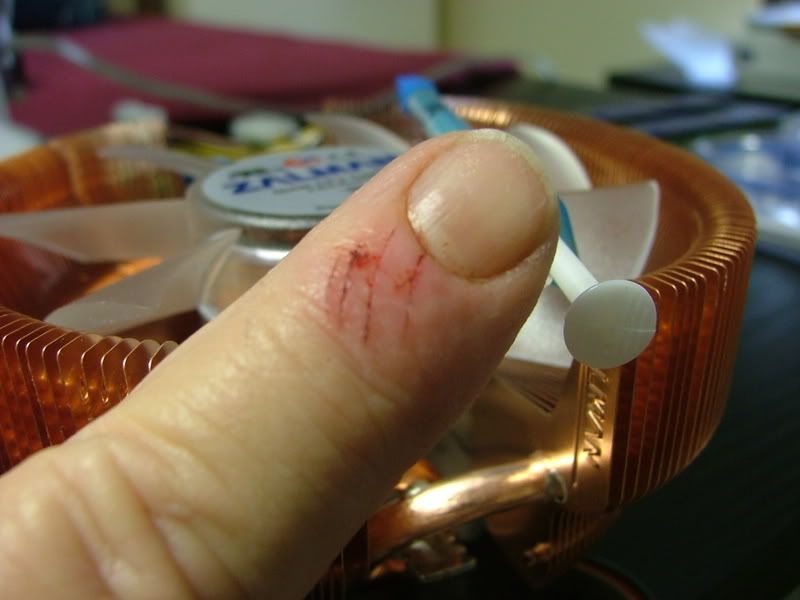
While unplugging the zalman CNPS8700 from the boards fan header I managed to smack my finger in the hsf as I pullâ¦..lets just say the blades are sharp and anyone care to guess the blade spacing??
Okay when I pulled the CPU cooler out of it box, I suddenly realized something â no mounting instructions! Hay, remember Iâm a NOOB to this and a bit more paranoid than I probably should be. As it turns out my supplier from Germany has a great set of tutorials covering everythingâ¦..
http://www.aqua-computer-berlin.de/catalog/tutorials.php?osCsid=4j30suemja98u673ani7v4kml1
Stefan aka [MMM]slame has done them in both German and English!
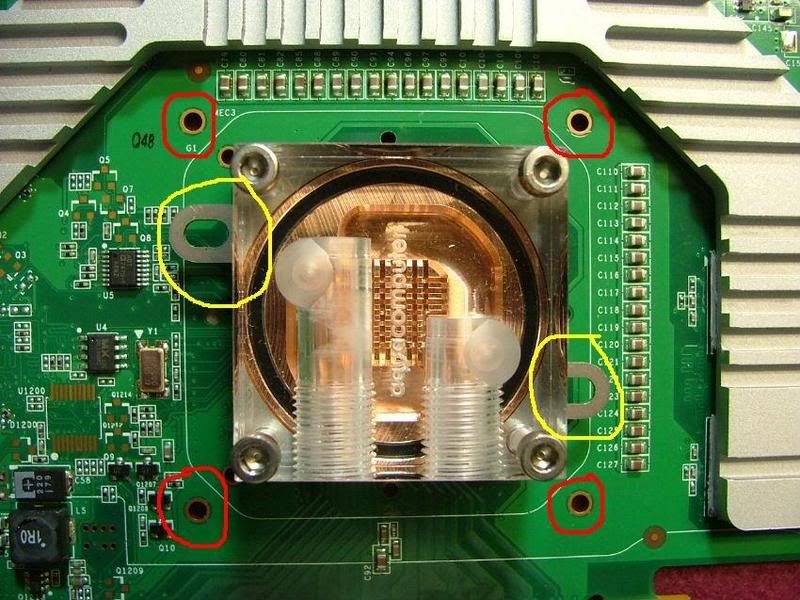
Anyway I mounted the two straight fittings to the CPU block and then went to mount it to the mobo. One think I did notice (on the nView anyway) is the mounting holes are noticeably larger than the mounting bolts for the block. One of the disappointments that I had with this block was the finish on the base. Sadly my picture was fuzzy so I couldnât use it, but it was discolored and had plenty of machine marks. After all of the shinny goodness on the top parts this was a bit of a let down.
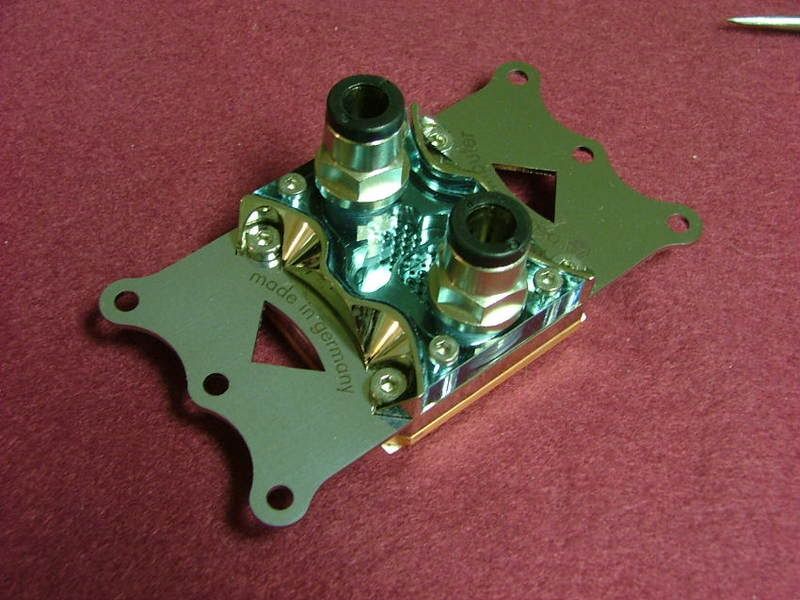 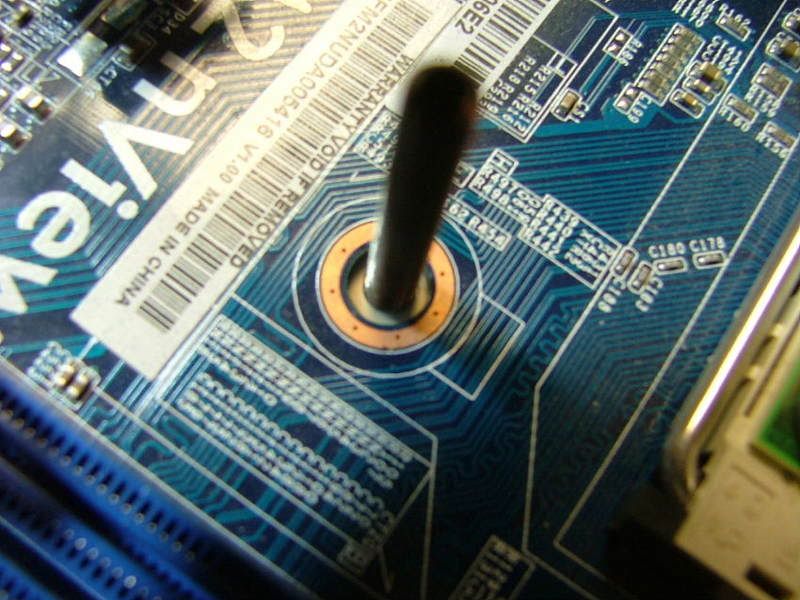
Here we have it mounted in place and I would defiantly change one thing if I ever have to remove it â shorten the mounting bolts.
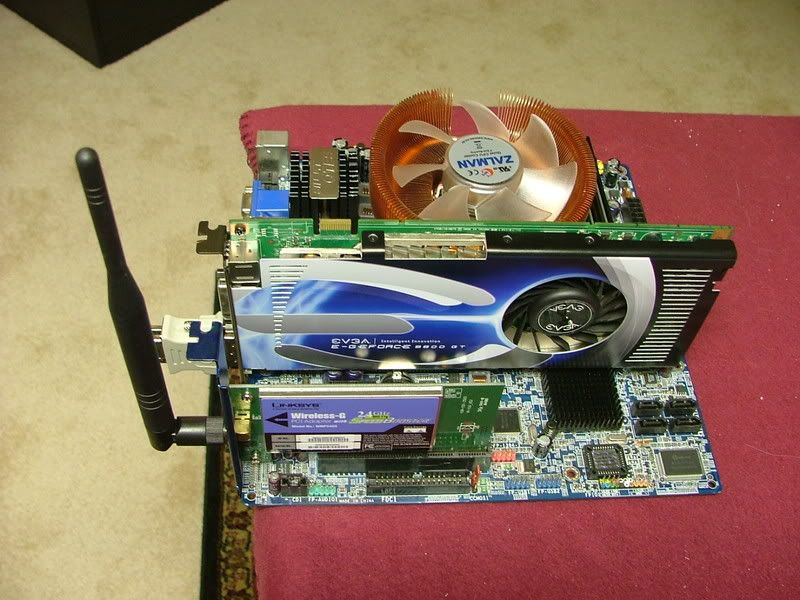
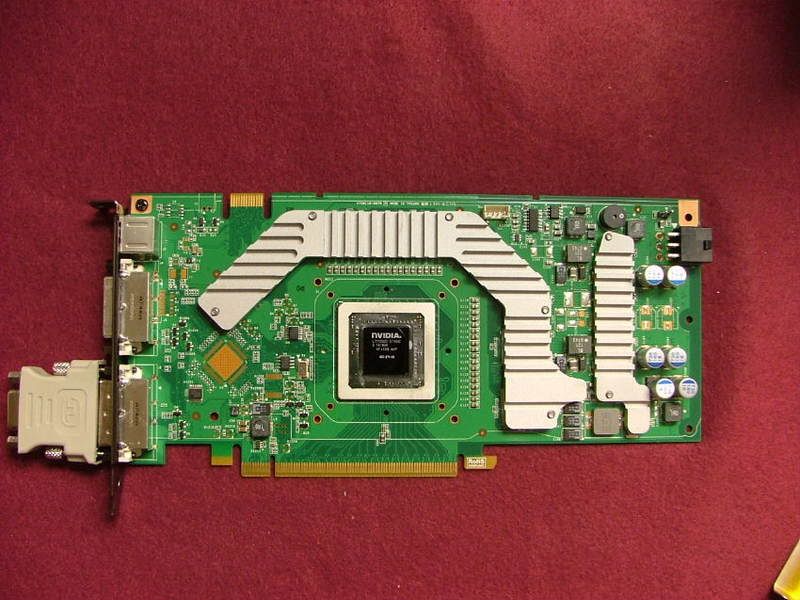
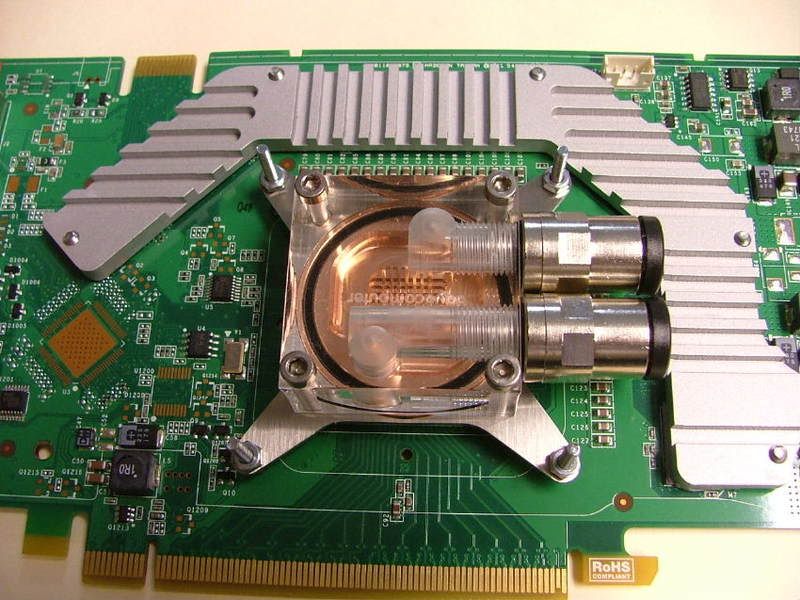
Now on to the GPU:
Here it is âneckedââ¦â¦.. and of course the chip!
 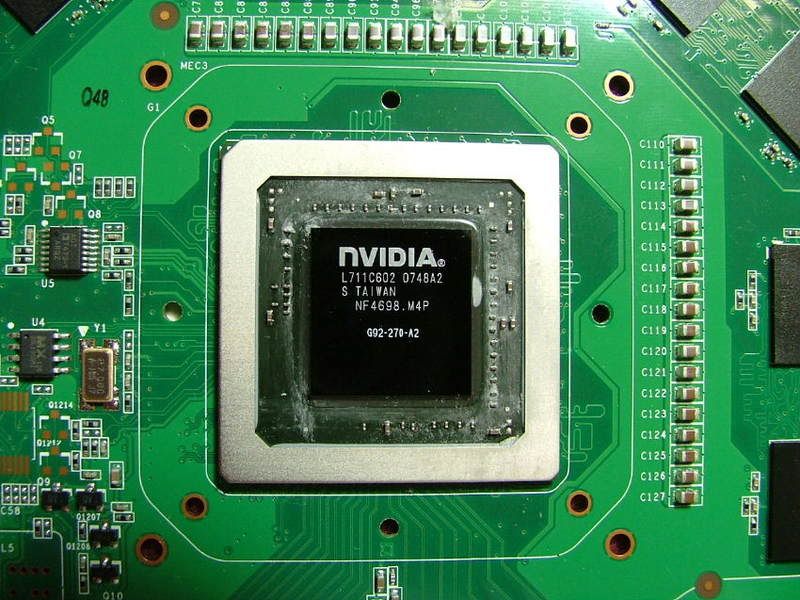
Since space limitations didnât let me use the cooler I wanted ( AquagraFX 8800 ) which offered full coverage I had find a way to cool my mem and volt reg chips. So enter these nifty pieces, "iandh 8800GT/G92 Memory & VRM cooling kit". I like these because they bolt on and one doesnât have to rely on epoxy or pads to hold âem in place.
Now I believe it was TheGlasMan at pcper who stated he preferred individual sinks as the memory chips arenât always the same height. When I took the cooler off of my evga 8800GT SC one could see proof of that. One mem chip wasnât touched at all and another only halfway. While looking at the following pictures you can see where there was contact (dark/rough areas) and wasnât (light/smooth areas). Also if you look at the cooler itself you should be able to pick up contact âimprintsâ on the pads. It looks like the volt regs are okay though.
  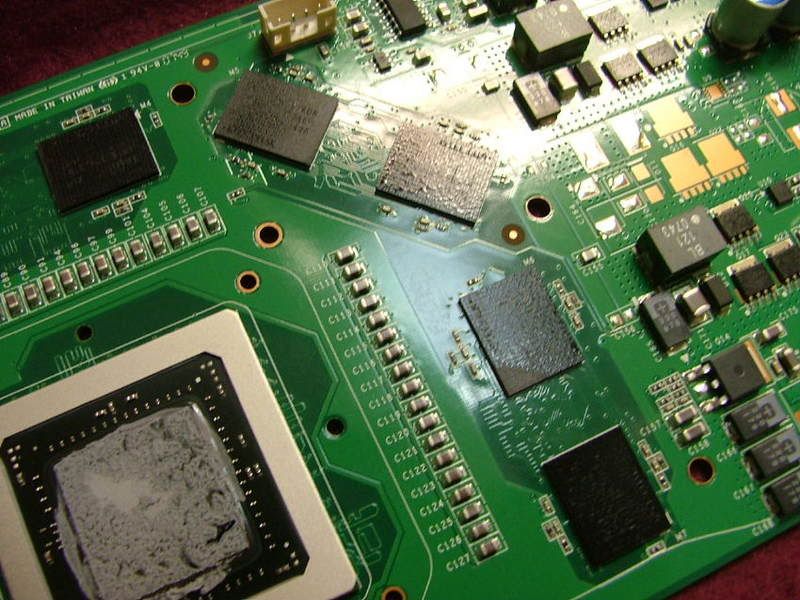 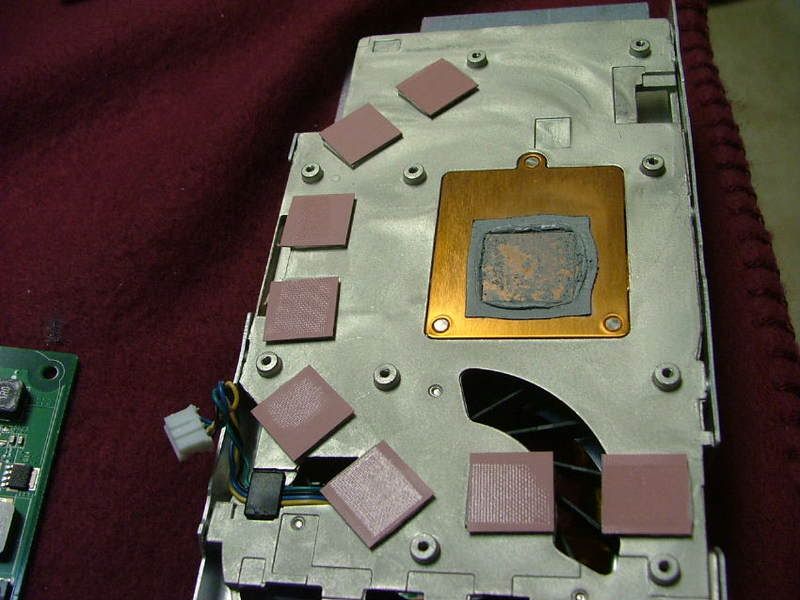
Now back to my âiandhâ sinks (interesting side story can be found over at xtremesystems on these things). Because of the potential of unevenness I kinda sorta âpilledâ on the thermal paste. Good example would be prepping the volt reg chips!

When everything was bolted down I did notice a couple of âpositioning issuesâ. Two of the memory chips were not completely covered at the volt reg end of the card as well as one of the volt reg chips (sorry for the fuzzy pic for that one).
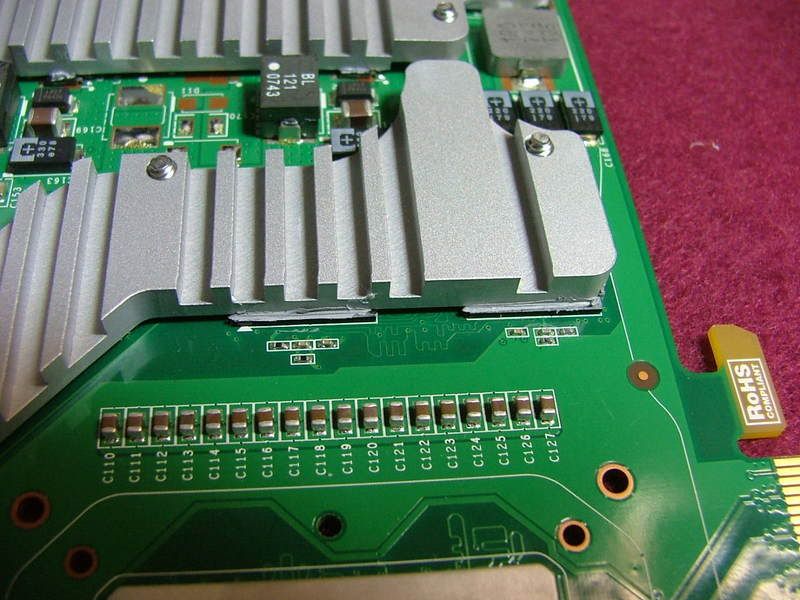 
And then here is the GPU with the sinks on waiting for the water block.
Now Iâm trying to figure out how I want to locate the in and out line from the 240 Pro. While an I/O plate is provided with holes and grommets to accommodate the tubing I had planned to use two bulkhead fittings to do the job. Again the final objective is to be able to remove the mobo tray with the mobo in place without having to disconnect any of the plumbing. Guess my question would be do I space them out as shown or should I move them closer together. If I mount them together, do I center, mount left (nearest the PSU), or mount right?
So this is where I be until the rest arrives! |
|
| Back to top |
|
|
jedihobbit
Rated XXX
Joined: 22 Mar 2007
Posts: 238
Location: Central Virginia, USA
|
| Posted: Sat, 03 May 2008 20:18:28 Post Subject: |
|
|
Well was hoping this up date would be with something together, but the fates decided differently! 
The box came in on April 22nd. Too tired to do anything so waited 'til the next day to open everything. Lots of cool stuff so tried to figure out where to start..... Oh there ya go the GPU! Opened the box marked twinplex pro FX6800/7800/7900/8600 and almost cried!!   
Here it sits on the 8800GT amd you tell what's wrong! Hint RED = 8800GT and YELLOW = ATI
E-mailed and PM'ed slame and now awaiting the correct bracket, thank goodness the block is modular and has interchangeable mtg brackets. Don't ya just love it when you're the "exception"?
_________________
As of 02/01/11
DreamCatcher AM3 >> (Down Again) >> SG01 Evo, MSI 785GM-E65, PII X4 955(AQ H2O Cooled), XFX GTX285(EK H2O Cooled), Seagate 7200.10 ST380815AS 80GB, 2 x G.S. F3-12800CL7D-2GBPI, MODU82+ EMD525AWT, XP Home SP2
KestrelFlight >> (Under Construction) >> Zalman Z7+, MSI NF980-G65, PII X4 1055T, 2 x Galaxy 580GTXs, Zalman 32GB SSD, WD V'Raptor 300GB, 2 x WD 1 TB Blacks, G.S. F3-16000CL9D-4GBTD, Zalman ZM1000-HP Plus , Win7
Oz1a v2.0 >> XFX MDA72P7509 750a, PI X2 8870BE, 2 x XFX GTS250, WD 250GB, F2-8500CL5D-2GBPK, Tt TR2 600W, XP Pro SP3 |
|
| Back to top |
|
|
jedihobbit
Rated XXX
Joined: 22 Mar 2007
Posts: 238
Location: Central Virginia, USA
|
| Posted: Mon, 05 May 2008 10:38:19 Post Subject: |
|
|
It kind of looks there might be a silver lining to the dark cloud of the âwrong part delayâ issue. I wanted to do the âtotalâ W/C thing at one time, thatâs the reason for not doing anything with DC for a while. Havenât been idle though (much to wife cringe) as Iâve started working on a friendâs mATX build, checking and ocâing his Tf7025/4400+ Brisbane, and thanks to fleabay âplaying with another nViewâ.
This is the setup used on the Tech Station and because of this it looks like DCv2.0 has a âmajorâ changes (Bold/Italics) :
Mobo: abit NF-M2 nView
CPU: Opty 1210 CCB6F 0750EPMW
HFS: zalman CNPS8000 (for testing on air)
Memory: G. Skill F2-6400PHU2-2GBHZ PC2-6400
Using ClkGen and SPi (only do 8m runs) I was able to pull 361.67 X9 = 3.255GHz @ 677 2T http://valid.x86-secret.com/show_oc.php?id=355523
For a âstableâ run did a 6 hour run of OCCT at 353 X9 = 3.177GHz @ 677 2T
http://valid.x86-secret.com/show_oc.php?id=355794
I going to use the spare nView from this test also so as not to disturb the âmatchâ.
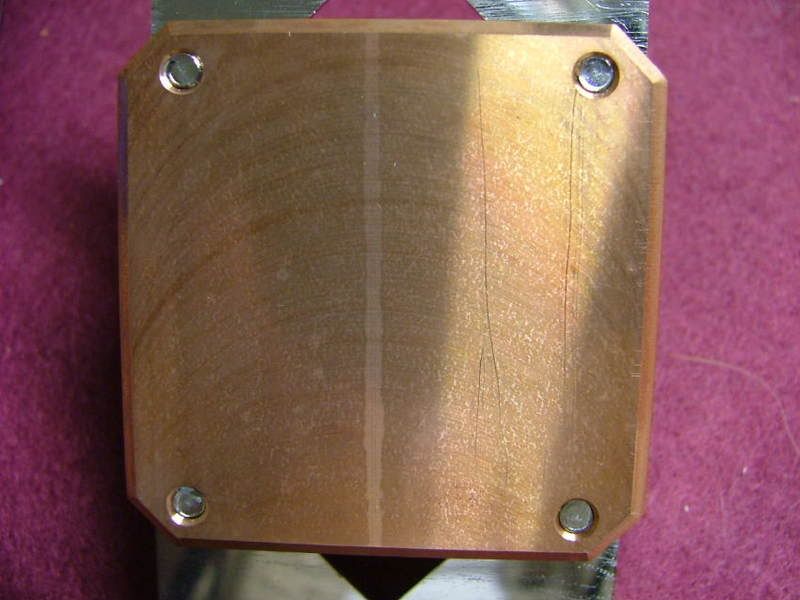
Also took this opportunity to address one of the earlier issues that was one of my âlittle disappointmentsâ with the CPU blockâ¦â¦the finish. So around 23:30 â 24:00 pull the block off of the 4000+ so I could lap the bottom. After cleaning off the goo here is a picture of the âfactory finishâ (excluding the two long scratches I did that clean off the paste):
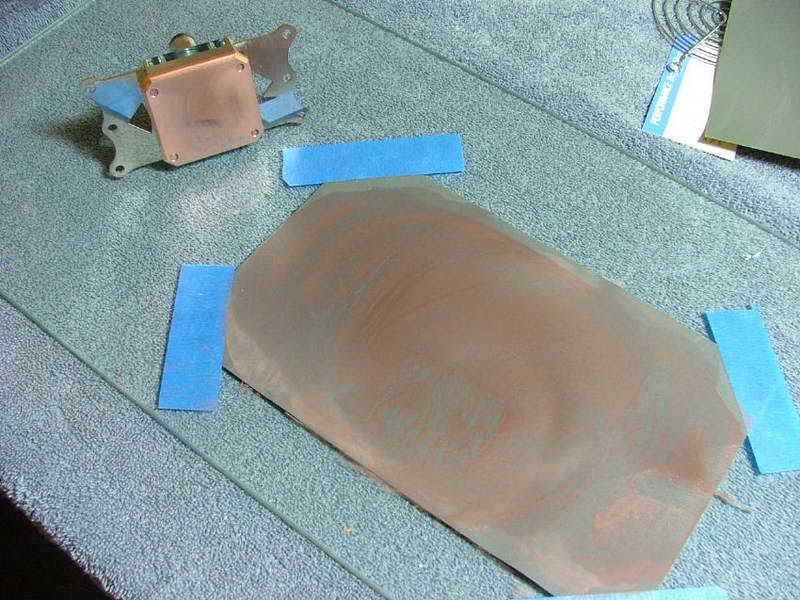
Here I am about half-way âdoneâ using 600 wet/dry. Interesting to note the edges are âpolishing outâ first. Also here is a pick of my âlapping layoutâ, using a sheet of glass for flatness and tapping down the sand paper.
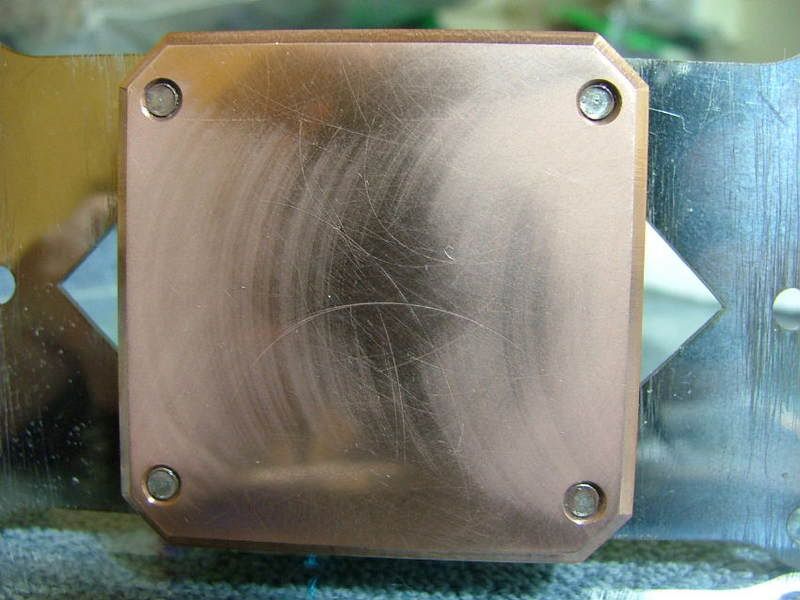 
Didnât have any 1000 grit so I used my last sheet of 2000â¦â¦â¦..so about 30 minutes later and no more super fine sand paper I call this âsomewhat doneâ as there are still âscratchesâ cause by the sand paper filling up.
Slame was able to mail me a replacement bracket a while back so I should be seeing it shortly. Problem is now I have plants and planters to work on!!
_________________
As of 02/01/11
DreamCatcher AM3 >> (Down Again) >> SG01 Evo, MSI 785GM-E65, PII X4 955(AQ H2O Cooled), XFX GTX285(EK H2O Cooled), Seagate 7200.10 ST380815AS 80GB, 2 x G.S. F3-12800CL7D-2GBPI, MODU82+ EMD525AWT, XP Home SP2
KestrelFlight >> (Under Construction) >> Zalman Z7+, MSI NF980-G65, PII X4 1055T, 2 x Galaxy 580GTXs, Zalman 32GB SSD, WD V'Raptor 300GB, 2 x WD 1 TB Blacks, G.S. F3-16000CL9D-4GBTD, Zalman ZM1000-HP Plus , Win7
Oz1a v2.0 >> XFX MDA72P7509 750a, PI X2 8870BE, 2 x XFX GTS250, WD 250GB, F2-8500CL5D-2GBPK, Tt TR2 600W, XP Pro SP3 |
|
| Back to top |
|
|
jedihobbit
Rated XXX
Joined: 22 Mar 2007
Posts: 238
Location: Central Virginia, USA
|
| Posted: Mon, 12 May 2008 18:01:43 Post Subject: |
|
|
All righty nowâ¦..time to get on with it! Going to kinda start over on the water cooling stuff now that everything appears to be here!
Initially when I got home on the day of arrival I was greeted by THE BOX
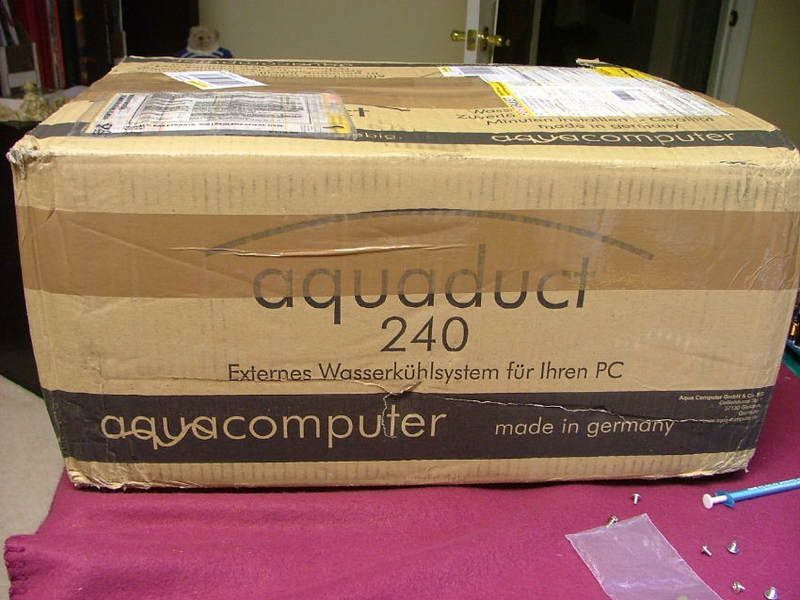 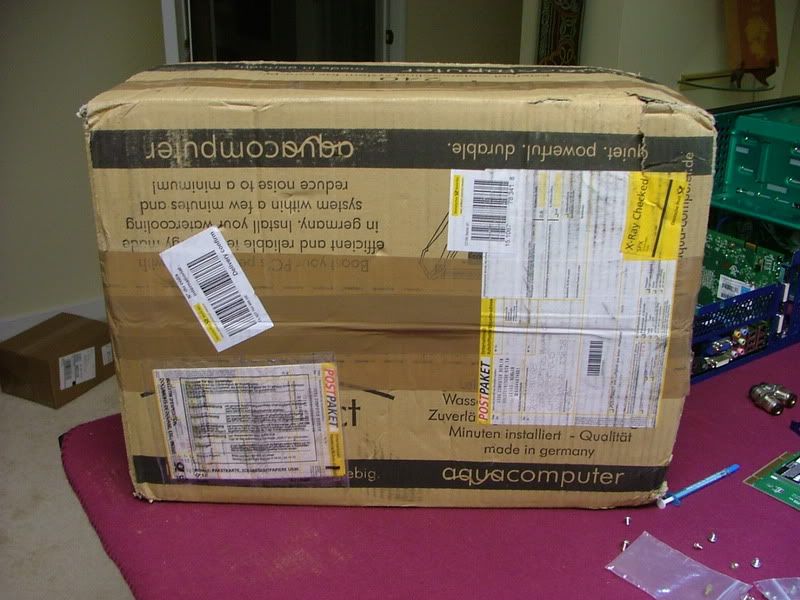
And inside were all of the goodies as well as some extra, thanks slame!
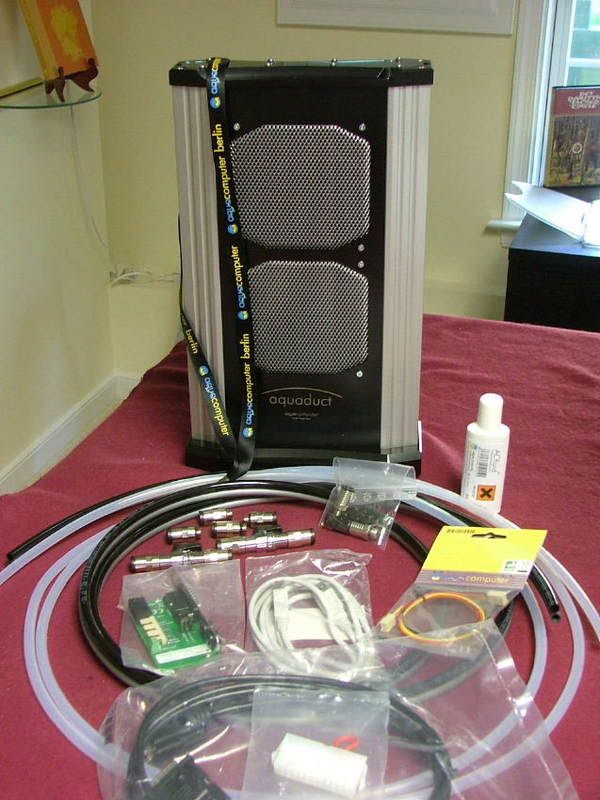 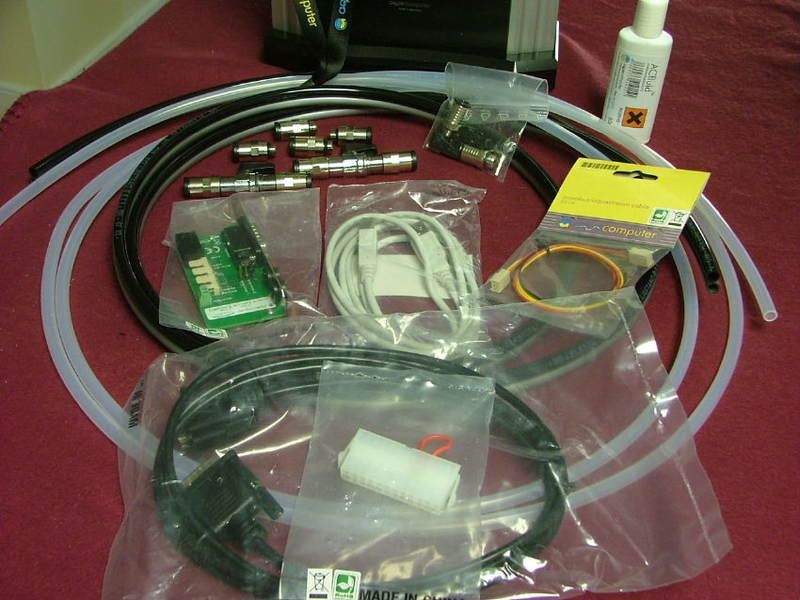
Just, for me anyway, there is still one major thing missingâ¦.a set of instruction for setting up the 240 IN ENGLISH. Slame any suggestions for a source I can download?
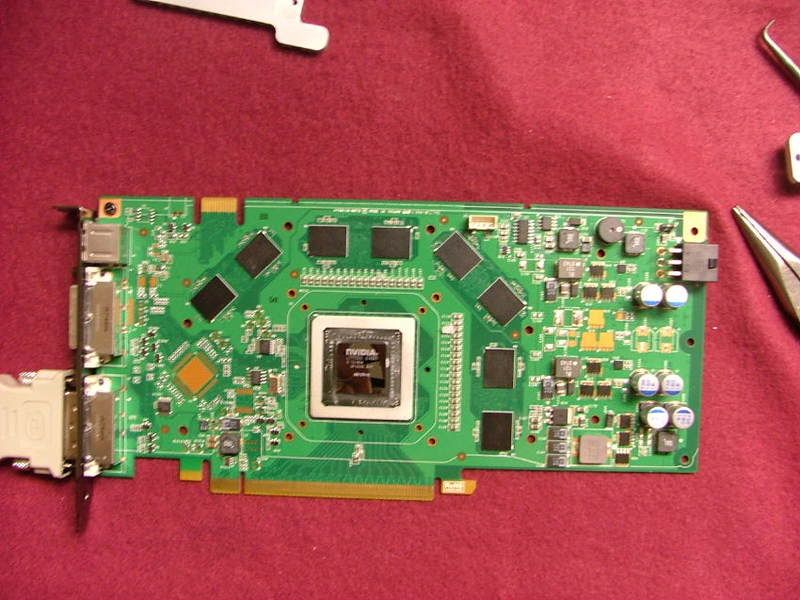
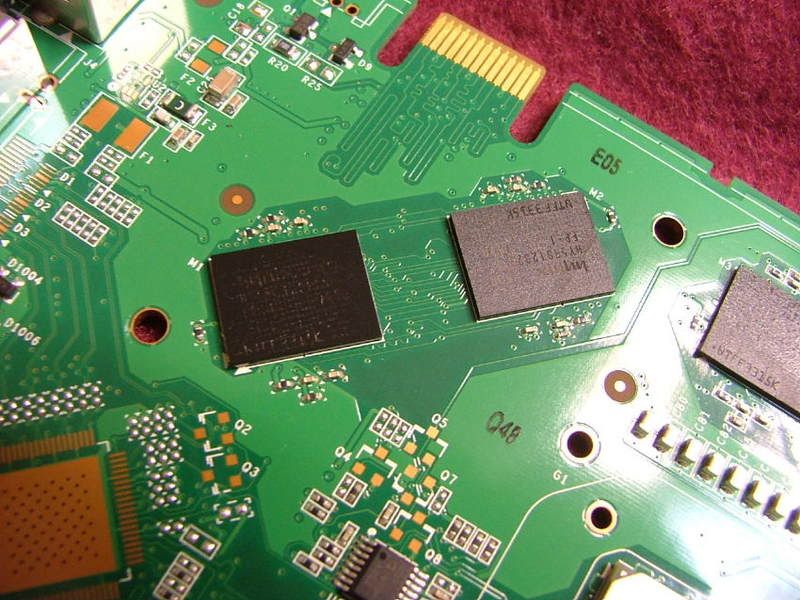
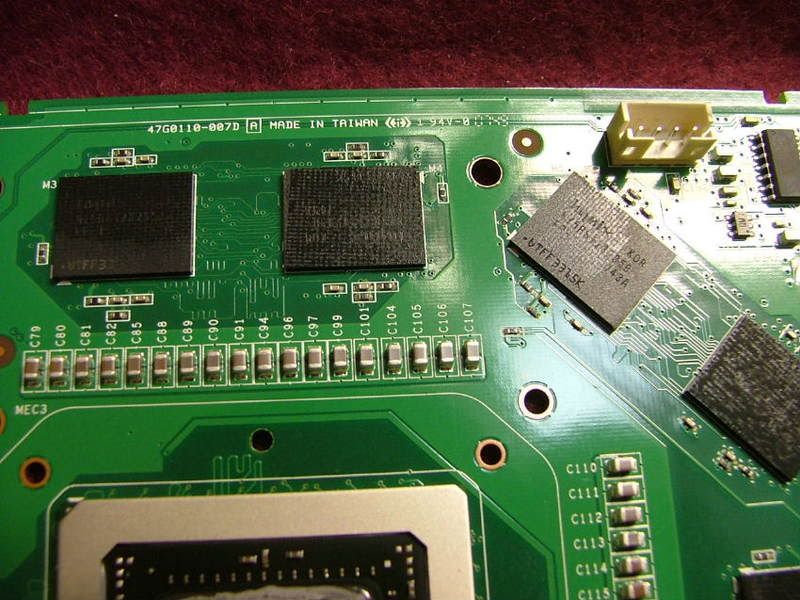
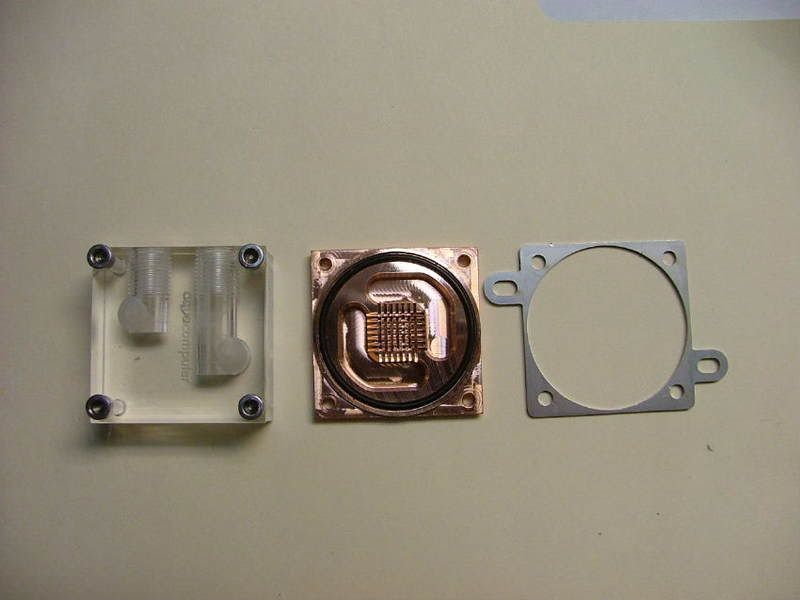
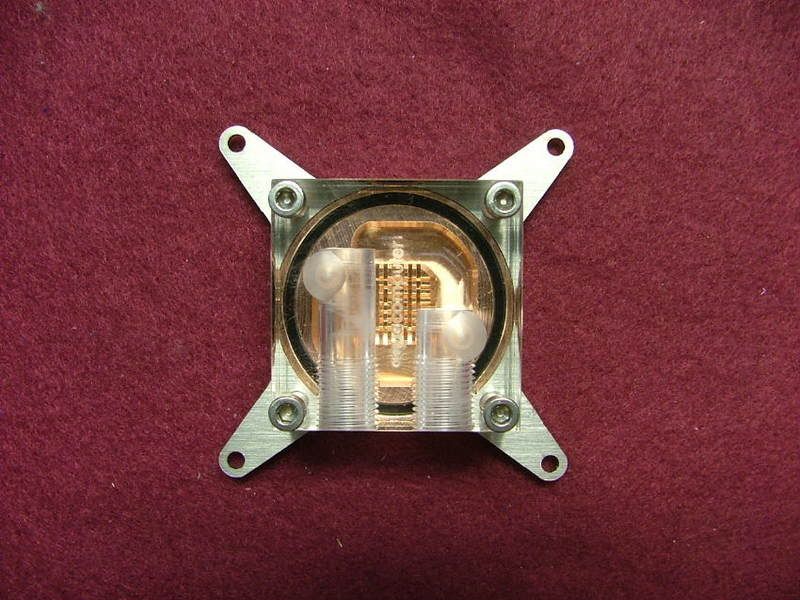
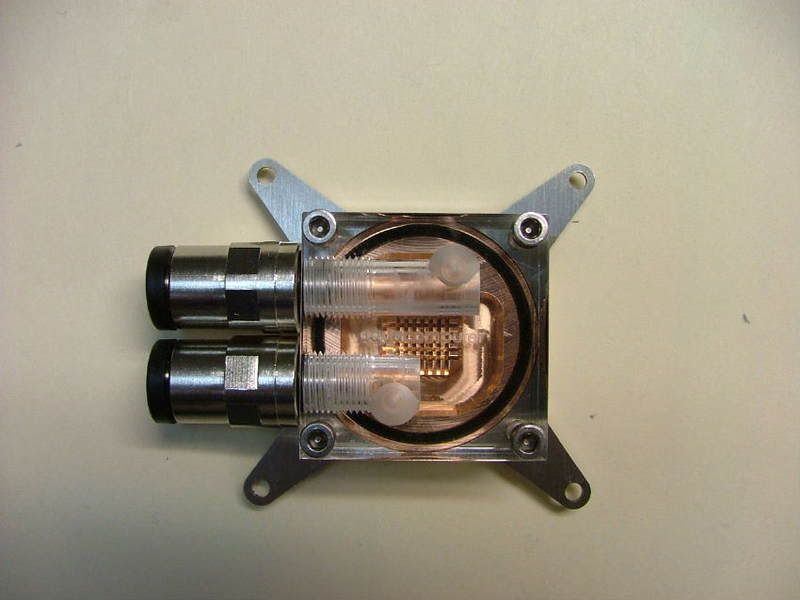
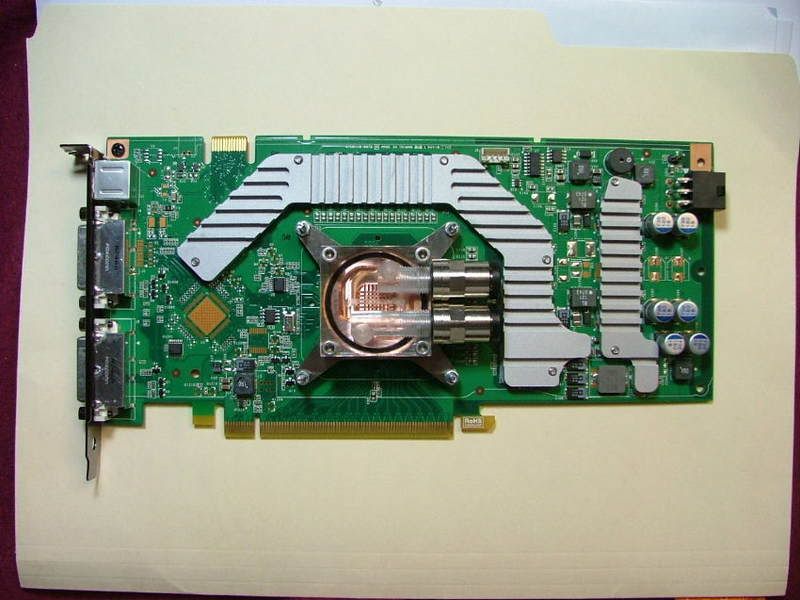
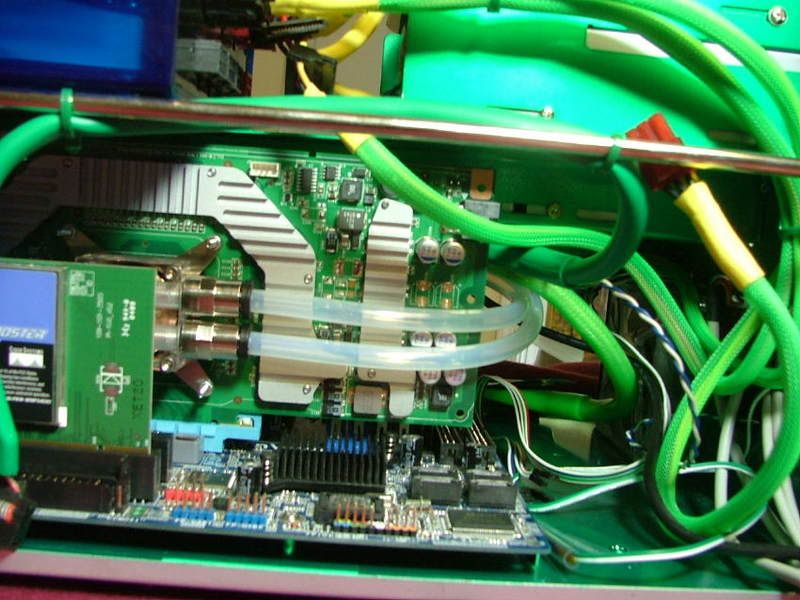
The letter with the GPU bracket arrived Saturday and between trying to finish a friends MicroFly build (link) I started puttsinâ with the w/c stuff. First off was to convert the GPU block from ATI to 8800GT. The bock is a beautiful example of engineering and simplicity. Still regret that the case design didnât let me use the full coverage version though. What you see is the unit apart, then it is nvidia, and then with the connectors. When I mounted it on the card I had to make a few assumptions as there werenât any instructions (guess it mounts like a chipset cooler!). Youâll see it up close and the whole card.
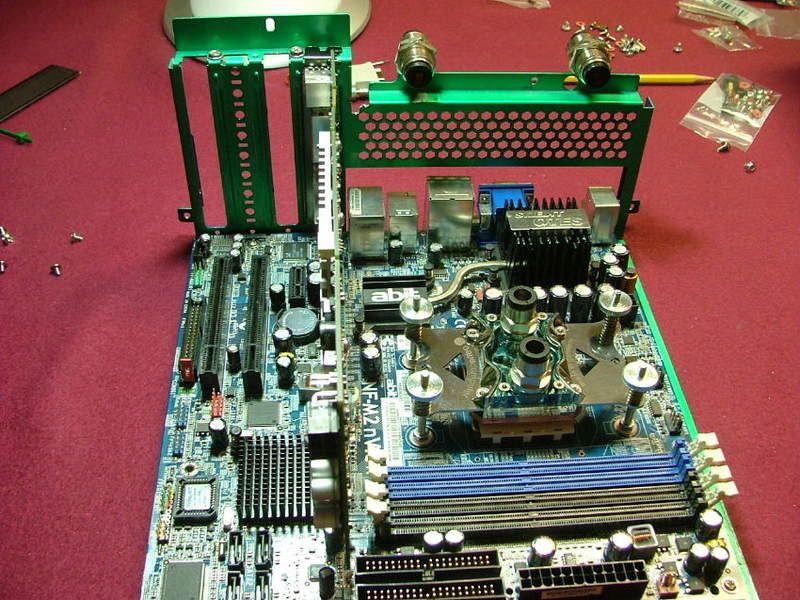
Now on to mounting everything to the moboâ¦.figured the best way to locate where I wanted the bulkhead connectors was to lay out the plumbing as the Plug & Cool tubing is very rigid and needs a large bend radii to work. Have everything ready to go, added the Aquaduct 240 controller and started laying out tubing.
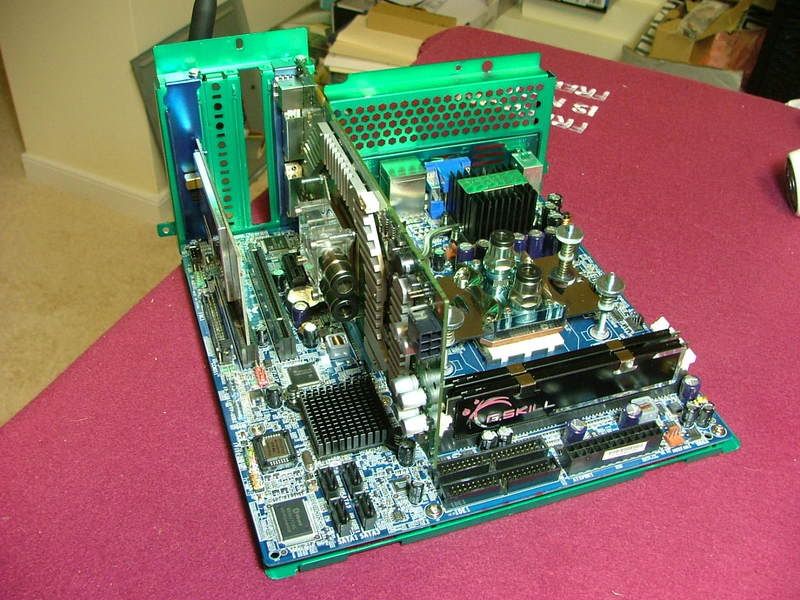 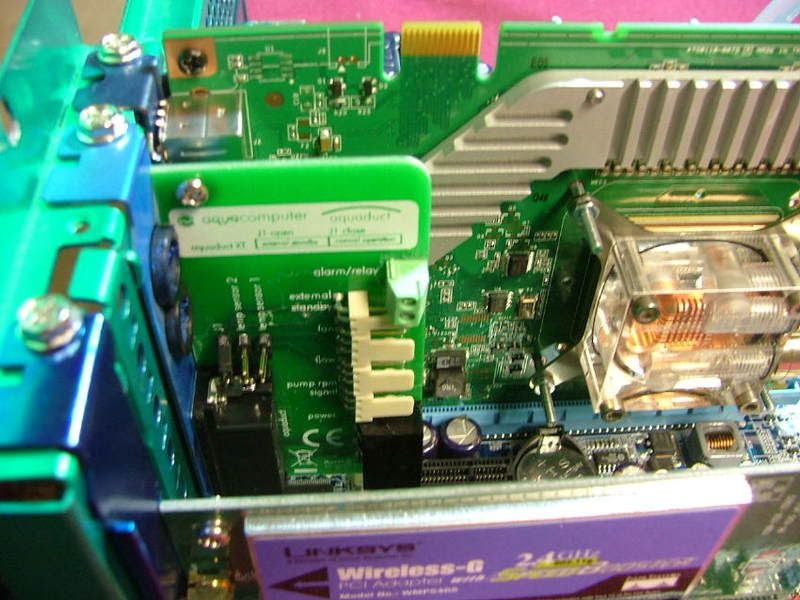 
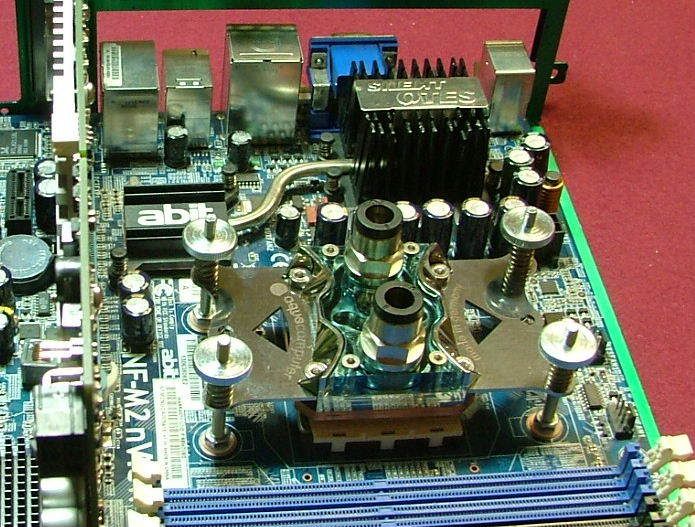
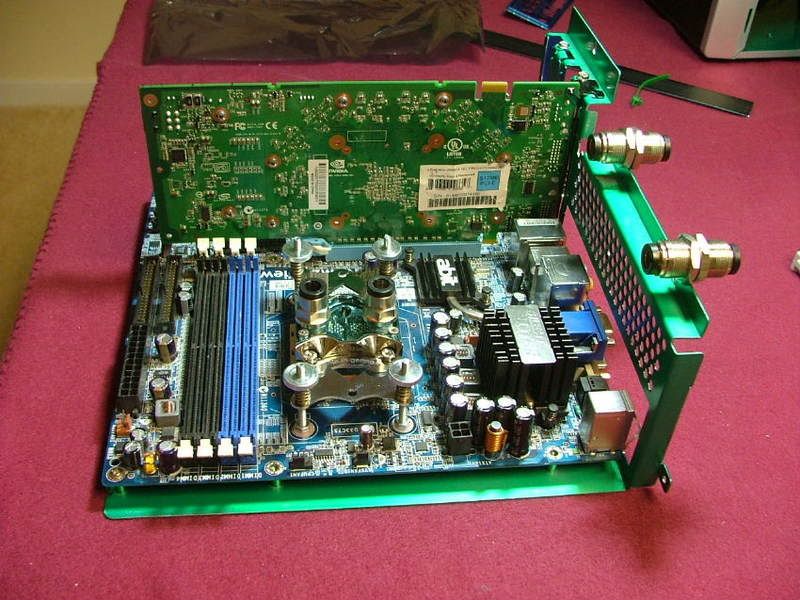
Then it dawned on me that I better ask about the CPU block in and out points (see above) and as luck would have it was âupside downâ to what I wanted to do so had to reseat the water block! Spotted where I wanted to mount the bulkhead fittings and realized I didnât have a drill bit large enough. However with the hole pattern it turns out all I had to do, using the dremel, make a few cuts, hand file, and mount the units. So here you have the internal plumbing. The last picture kind of shows just how rigid the hose is as it is pushing the vertical part of the mobo tray outward. Luckily the mounting screws will keep it in place. Really canât shorten the tube as it will want to kink at the block.
 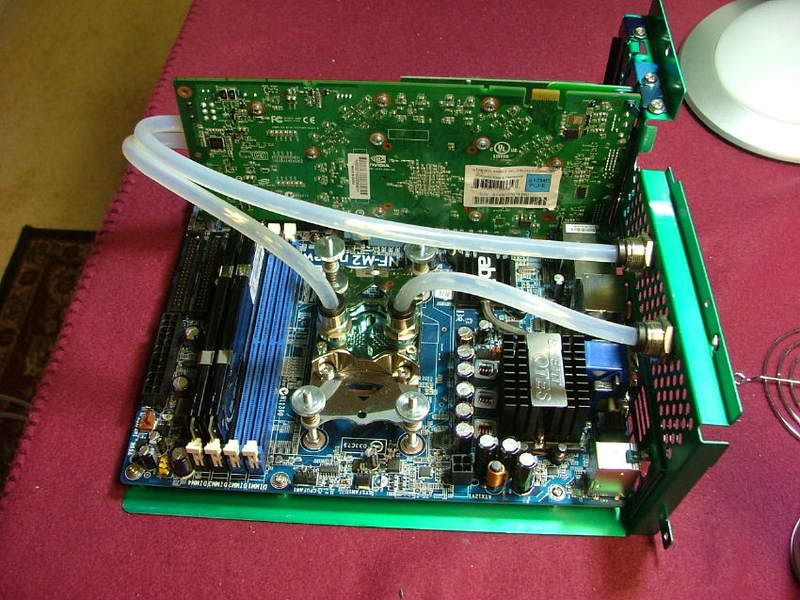  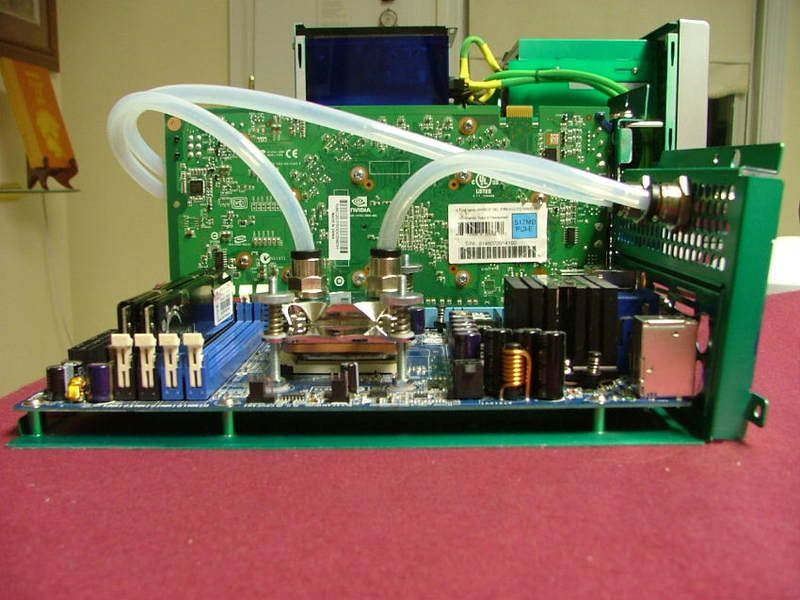
Now it is time to see what the tubing will interfere with once the mobo tray gets shoved into place. As it turns out the only âobviousâ interference seems to the double loop coming from the GPU as 1.) when you first start (catches on the chassis opening) but easily handled by just pushing them down, and 2.) Working around the IDE cable as it comes down from the optical drives.
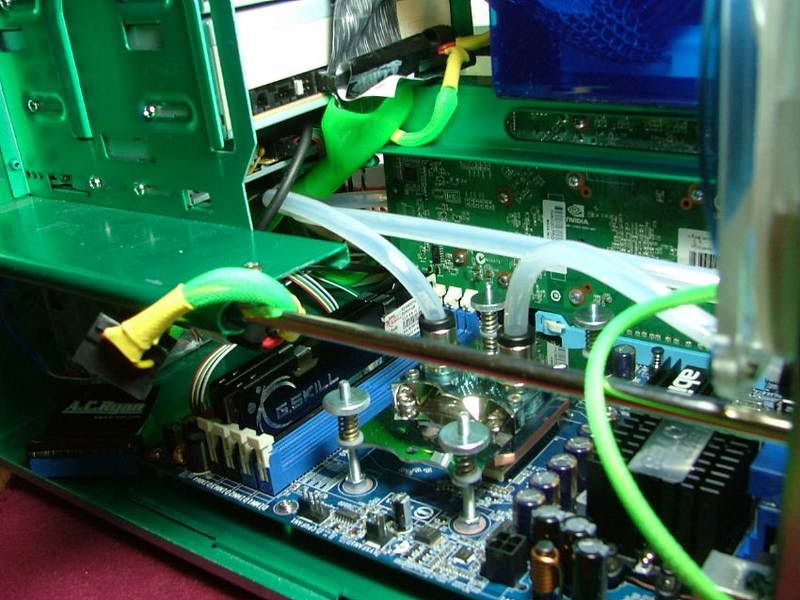 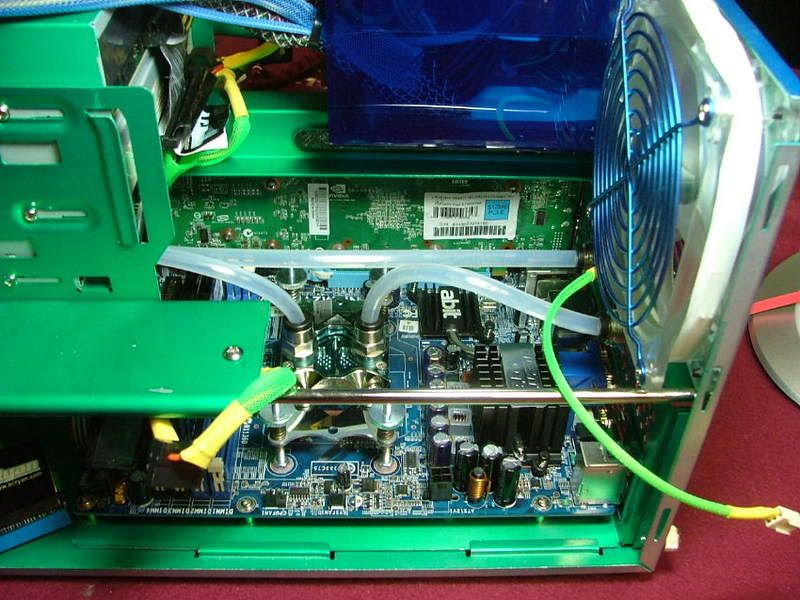 
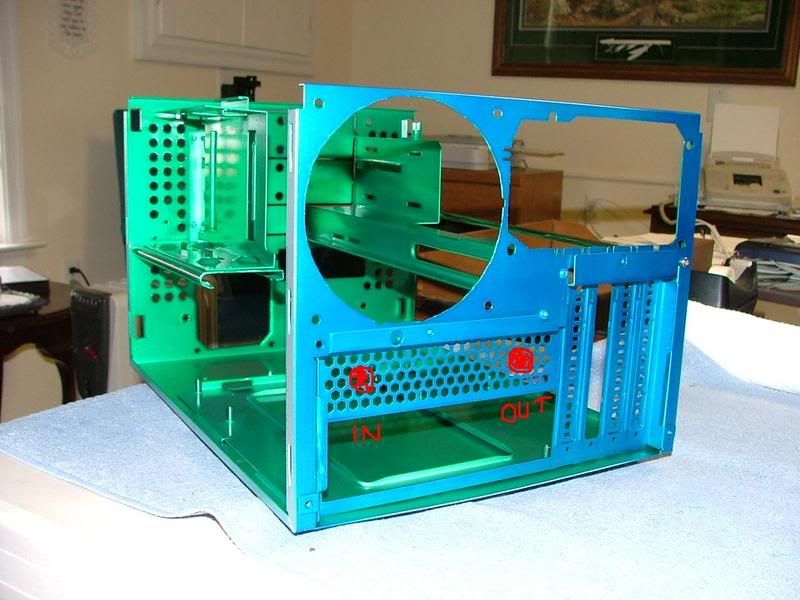
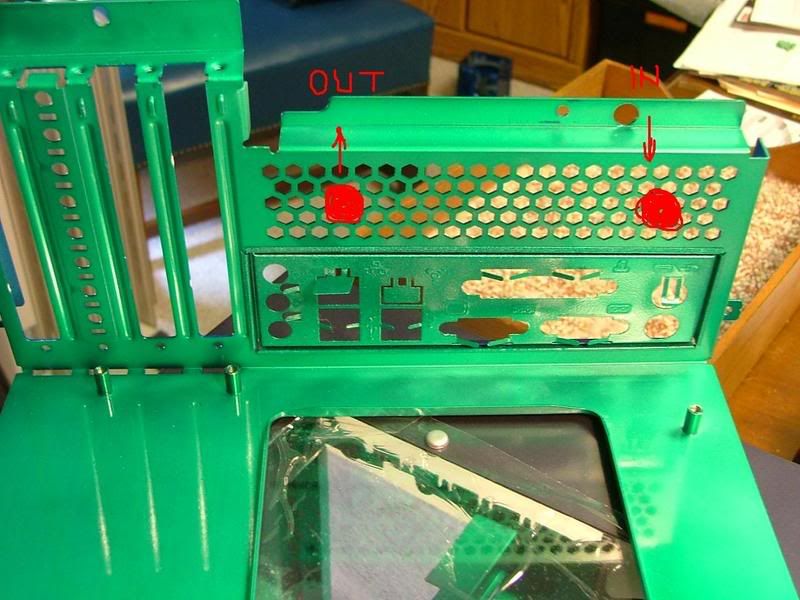
With the final installation wiring management should clean up a lot of the other âsecondaryâ issues. And in closing here are a couple of views âfrom the rearâ with the mobo mounted in the chassis showing the bulkhead fittings. So it seems I may have accomplished on of my goals on this build and that is being able to remove the mobo tray and leave the internal water loop intact.
_________________
As of 02/01/11
DreamCatcher AM3 >> (Down Again) >> SG01 Evo, MSI 785GM-E65, PII X4 955(AQ H2O Cooled), XFX GTX285(EK H2O Cooled), Seagate 7200.10 ST380815AS 80GB, 2 x G.S. F3-12800CL7D-2GBPI, MODU82+ EMD525AWT, XP Home SP2
KestrelFlight >> (Under Construction) >> Zalman Z7+, MSI NF980-G65, PII X4 1055T, 2 x Galaxy 580GTXs, Zalman 32GB SSD, WD V'Raptor 300GB, 2 x WD 1 TB Blacks, G.S. F3-16000CL9D-4GBTD, Zalman ZM1000-HP Plus , Win7
Oz1a v2.0 >> XFX MDA72P7509 750a, PI X2 8870BE, 2 x XFX GTS250, WD 250GB, F2-8500CL5D-2GBPK, Tt TR2 600W, XP Pro SP3 |
|
| Back to top |
|
|
SpeedZone
Rated NC-17

Joined: 06 Apr 2008
Posts: 193
|
| Posted: Tue, 13 May 2008 02:53:40 Post Subject: |
|
|
Very nicely done (AGAIN  ), jedihobbit. ), jedihobbit. 
And as a small reward...here is the link to the operating and assembly manual for 240 and 360 models,in English (in case this is the one you are searching):
http://www.aqua-computer.de/download/aquaduct_20070320_engl.pdf
And please post some temperature readings later, because as potential future buyer of some similar water cooling kit, I would really like to see how well can it cool down both cpu&gpu (sadly most of reviews test such units only with cpu cooler attached ).
Cya. 
_________________
Wikispecs.org - The Largest Product Database!
DuplicatorGuide - Your source for CD/DVD/BD Duplicators, Disc Printers, Replication, Duplication...
I-Zune - Global Homepage for Microsoft Zune, Accessories, Software, Wallpapers,... |
|
| Back to top |
|
|
jedihobbit
Rated XXX
Joined: 22 Mar 2007
Posts: 238
Location: Central Virginia, USA
|
| Posted: Tue, 13 May 2008 08:59:14 Post Subject: |
|
|
SZ where the H did you find that as I thought I had combed the whole site looking for it??? 
EDIT: Good find, but after reading it I realized there are some changes as I have the 240 Pro Mark II and my manual in German is dated Feb. of '08 and this English one is March '07. Will have to see what my source has for me! Again thanks.
_________________
As of 02/01/11
DreamCatcher AM3 >> (Down Again) >> SG01 Evo, MSI 785GM-E65, PII X4 955(AQ H2O Cooled), XFX GTX285(EK H2O Cooled), Seagate 7200.10 ST380815AS 80GB, 2 x G.S. F3-12800CL7D-2GBPI, MODU82+ EMD525AWT, XP Home SP2
KestrelFlight >> (Under Construction) >> Zalman Z7+, MSI NF980-G65, PII X4 1055T, 2 x Galaxy 580GTXs, Zalman 32GB SSD, WD V'Raptor 300GB, 2 x WD 1 TB Blacks, G.S. F3-16000CL9D-4GBTD, Zalman ZM1000-HP Plus , Win7
Oz1a v2.0 >> XFX MDA72P7509 750a, PI X2 8870BE, 2 x XFX GTS250, WD 250GB, F2-8500CL5D-2GBPK, Tt TR2 600W, XP Pro SP3 |
|
| Back to top |
|
|
SpeedZone
Rated NC-17
Joined: 06 Apr 2008
Posts: 193
|
|
| Back to top |
|
|
edvallie
Put Beer Here

Joined: 07 Aug 2005
Posts: 1255
Location: Computer
|
| Posted: Wed, 14 May 2008 10:05:57 Post Subject: |
|
|
What kind of PCMarks score do you get at stock speeds?
Nice writeup btw 
_________________
ABAP? What did you call me? |
|
| Back to top |
|
|
jedihobbit
Rated XXX
Joined: 22 Mar 2007
Posts: 238
Location: Central Virginia, USA
|
| Posted: Wed, 14 May 2008 10:28:58 Post Subject: |
|
|
| edvallie wrote: | | What kind of PCMarks score do you get at stock speeds? |
Never did any testing at stock. If your interesting in my oc'ing this setup on air you can check out my nView-1210 OCâing Thread however I didn't do any benchies. I think the only PCMarks I ran was with the original nView/ 4000+ Brisbane setup which I haven't posted here. Once the W/C setup is finished you will be seeing some.
| edvallie wrote: | | Nice writeup btw |
Sometimes I think I go into a TMI mode with my worklogs, thanks for the compliment!
_________________
As of 02/01/11
DreamCatcher AM3 >> (Down Again) >> SG01 Evo, MSI 785GM-E65, PII X4 955(AQ H2O Cooled), XFX GTX285(EK H2O Cooled), Seagate 7200.10 ST380815AS 80GB, 2 x G.S. F3-12800CL7D-2GBPI, MODU82+ EMD525AWT, XP Home SP2
KestrelFlight >> (Under Construction) >> Zalman Z7+, MSI NF980-G65, PII X4 1055T, 2 x Galaxy 580GTXs, Zalman 32GB SSD, WD V'Raptor 300GB, 2 x WD 1 TB Blacks, G.S. F3-16000CL9D-4GBTD, Zalman ZM1000-HP Plus , Win7
Oz1a v2.0 >> XFX MDA72P7509 750a, PI X2 8870BE, 2 x XFX GTS250, WD 250GB, F2-8500CL5D-2GBPK, Tt TR2 600W, XP Pro SP3 |
|
| Back to top |
|
|
|
|
You cannot post new topics in this forum
You cannot reply to topics in this forum
You cannot edit your posts in this forum
You cannot delete your posts in this forum
You cannot vote in polls in this forum
You cannot attach files in this forum
You cannot download files in this forum
|
|


