Configuration:
A system with the following components was used to test the OCZ Technology 6GB PC3-12800 Blade triple channel memory kit:
» Intel i7 920 quad core processor
» Gigabyte GA-EX58-UD3R LGA 1366 X58 ATX motherboard with BIOS F6
» Sapphire Toxic Radeon HD4870 512MB PCI Express graphics card
» Maxtor MaxLine III 250GB SATA 3Gbps hard drive
» TSST Super WriteMaster optical drive
» Nesteq EECS 700 Watt power supply
» Windows 7 RC1 64-Bit operating system
I discovered something about this memory kit that I had not noticed prior to the first boot into the system BIOS. I entered the BIOS to make sure that the XMP profile was enabled, and searched around for a few seconds before I realized there wasn't one. A quick trip to the Internet with another system confirmed that I was wrong to have assumed that a kit like this would have an XMP profile to make getting up to speed that much easier. While it may have only taken 20 seconds of "work" to set things manually, I was a bit disappointed.
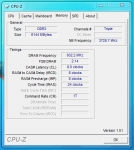
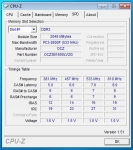
The screenshots below are from
CPU-Z, and are provided to show the details regarding the memory. The below left image shows the SPD tab, where information on the memory and its four timing profiles are provided. Despite being rated for tight timings up to 1600MHz, the fastest profile is for 1220MHz at rather loose 8-9-9-19 timings. The below right image shows the Memory tab with the memory manually configured to match the advertised specifications of 1600MHz and 6-6-6-24 timings. The BIOS on this motherboard wouldn't let me get right to 1.65V, so I settled on 1.64V and hoped that the hundredth of a volt wouldn't be an issue. In reality, the memory ran at 1.50V when set to 1600MHz, but I used 1.64V anyway just to adhere to the specifications. After some initial testing to confirm that the stock settings were stable, I proceed to try my hand at overclocking.
 Overclocking:
I will not claim to be an i7 overclocking wiz just yet, as I really haven't had enough experience to know enough. But, I did make efforts to push the system to a new high speed for comparison purposes. I first attempted overclocking using the base clock, and was able to get from 133MHz to 150MHz before things started getting flaky. This resulted in the memory running at 1800MHz (150MHz x 12), and the processor running at about 3GHz (150MHz x 20).
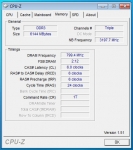
Seeking a way to get the memory even higher, I dropped the base clock speed back down to 133MHz, and then simply increased the memory multiplier from 12x to the next choice, 14x. This kept the CPU at its stock speed of 2.67GHz, while increasing the memory speed to 1867MHz (133MHz x 14). I set the timings to automatic in the BIOS and booted in to Windows. Everything looked good, and CPU-Z confirmed that the timings were now 9-10-10-21. I then returned to the BIOS and manually adjusted the timings to see how tight I could get them. I didn't spend an extreme amount of time on this, but was pleased with 8-8-8-24, and decided to run with that as my overclocked best: 1867MHz at 8-8-8-24 timings and 1.64V. The screenshot below confirms these settings: