Initial Set Up and Installation:
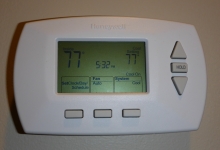
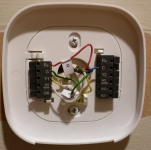
Let’s face it, for some reason many people are terrified when it comes to messing with wiring. Sometimes this is a good thing, but in the case of this install it really is quite easy if you follow the directions and label everything appropriately. As you can see in the first picture I was replacing a Honeywell rectangular programmable thermostat.
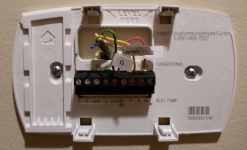
I will not cover every step but the first thing you should do is kill the power to your HVAC system by either throwing the emergency switch or the breaker. After that you are set to go. Now one potential problem for many people will be the lack of a C wire to supply power to the device. As you can see in the picture below, my thermostat did not use the C wire. The installer clipped it but it is present in the bundle. This is likely the case for many people out there since this is a standard wire in the HVAC industry. So I labeled my existing wires and went down to the furnace to see if there was enough of the blue wire present there to make my terminations. Sure enough there was. Now if you did not have enough wire or no blue at all, ecobee does supply this thermostat with the power extender kit (PEK). The installation of this is straightforward as well but may intimidate more people since you need to do the wiring at the furnace. It should also be noted that even if you have the C wire; there are some cases where the PEK may still be necessary. After talking to an ecobee tech support agent, I was told that in some cases the voltage supply on the C wire is not clean. A telltale of this would be seeing the temperature go up right after the A/C is turned on. This is caused by a voltage fluctuation which is eliminated by the PEK.
After I removed the wires from the old terminal strip I marked my holes for the trim plate and set my wall anchors. Just before I snugged the screws I made sure the bubble level indicated that the trim plate was level.
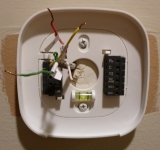
Then it is quick work to install the wires, matching the color codes. To get the wires installed you simply press on the tab on the outside of the terminal strip, slide the wire in and let go of the tab. In minutes you are ready to pop your thermostat face in place and power everything back up.
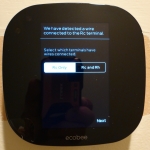
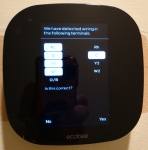
Now all the “hard” work is done and you are ready to start saving money. From here the rest of the setup is very intuitive and they walk you through everything, and it even auto detects where you have landed wires.
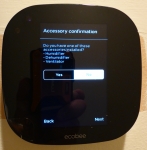
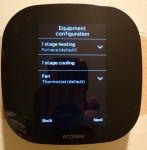
Next it will ask about accessory equipment installed on your system. Then you will configure the type of heating and cooling system you have and if you want the thermostat or furnace to control the fan.
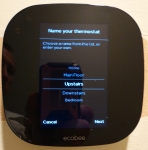
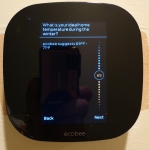
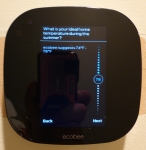
Next you give your thermostat a name; either from the pre-programed names or you can enter a custom name. Then the thermostat will ask you to set your ideal winter and summer temperature.
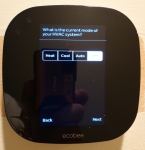
Next you will set the mode you want the HVAC to work in. The options are Heat, Cool, Auto, and Off. I ended up choosing Auto mode since in the fall and spring we often have days where we need heat and others that we would prefer to have some A/C. It should be noted that this mode is only advisable if your winter/summer temps are far enough apart. If you have your heat set for 70F and cooling at 72F, you could be cycling back and forth all day just wasting energy.